Showing posts with label copic coloring. Show all posts

Thursday, August 17, 2023

Doggone Good Friend Handmade Card

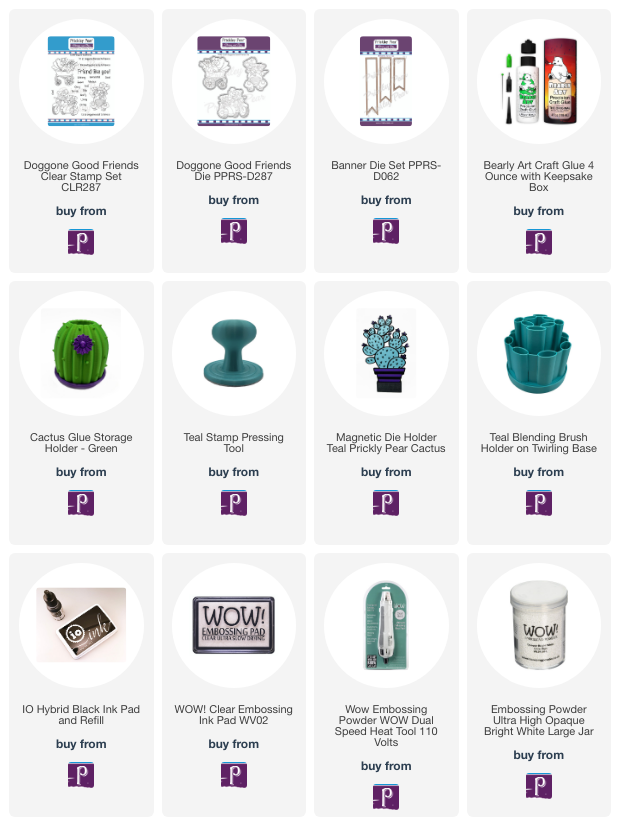
Hello to all my Prickley Pear Pals!  I hope you're having a fantastic day!  Joy, here and I sharing a fun friendship card using the Doggone Good Friend stamp set and coordinating die.  I think it's always good to tell those you care about that you're thinking of them don't you? Well with this stamp set you get three amazing images and get this, eighteen sentiments to build just the right greeting for your phone. I also like that the stamp is diverse and can be used for any occasion if you change up the sentiment. One of my favorite images is the one with two dogs in a carriage. Wouldn't that be great for a baby shower? So many possibilities with this set!!!


Prickley Pear Stamps


I chose the cute motorcycle with side car stamp that is included in the Doggone Good Friends set and colored it with Copics and then cut it out using the coordinating die. Next I stenciled the flames using Distress Oxides in the colors Mustard Seed and Crackling Campfire onto black cardstock. Once the inks were dry I embossed the top sentiment directly onto the panel using Wow Embossing Ink and white embossing powder. I thought it would be fun to emboss the bottom sentiment onto a Banner die too.

Tip: apply clear embossing powder over the card panel that was inked with Distress Oxides to make sure it is dry. You will know because the powder will stick. Be sure to brush off the powder and dry the ink with a heat tool before embossing your sentiment.

To finish off my card I popped up the elements onto foam tape and then added yellow confetti bling. I think it turned out super cute. Let me know what you think...


For more Prickley Pear Stamps inspiration check these out:
Shop
Instagram
Prickley Pear Pals Facebook Page
Prickley Pear Stamps Blog
Pinterest


You can connect with me here:
IG @joywilsonink
Pinterest
Youtube

Bye for now!!! 

Saturday, August 12, 2023

Saturday August 12th, Christmas with Spinach and Ramona CLR288 Stamps


Happy Saturday Pals! Tia here with you from RockyMtnCraftia.com  I hope your have been enjoying the new release of  Christmas with Spinach and Ramona 

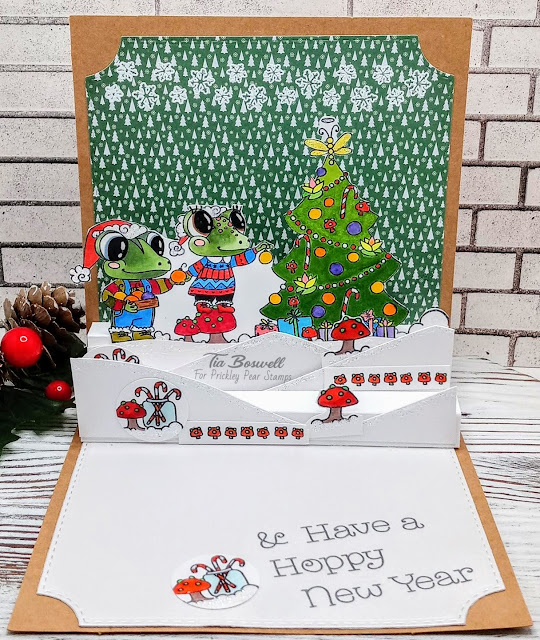
I have been playing around with 'pop-out' cards lately and knew these special frogs needed a very special card!

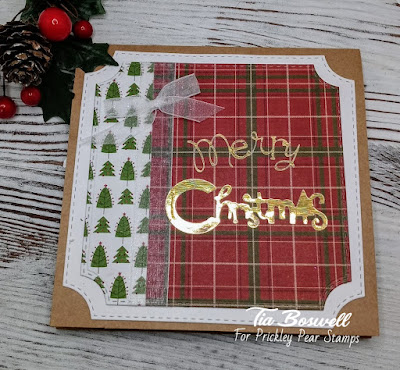
Here is the front of the card:


I used my Cricket to cut the greeting and then foiled it for that holiday flair.

Here is a close up of the inside.


I had so much fun adding stickles to my snowy peaks. And glossy accents to the ornaments, mushrooms, candy canes and even the froggy eyes!

These froggy siblings are too cute to pass up! Make sure you head over to the store and add them to your cart now!

There's more froggy goodness to come this month! As well as some more new stamps to the Prickley Pear Family, so make sure you keep logging in here and on the Facebook page!

Thanks for following along and now it's your turn to Go Get Crafty!

-Tia


Tuesday, July 11, 2023

Wrapped Up Like a Present with Koala Santa and Mrs Claus

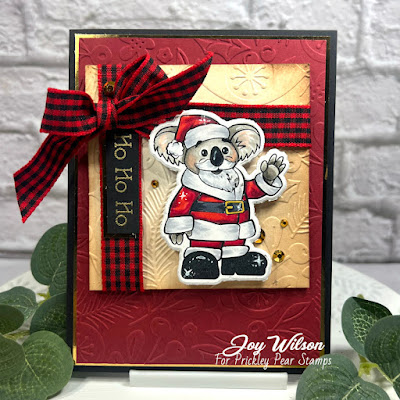
Hey it's Joy here with you today sharing a cute card with the Koala and Mrs ClausI figure everyone loves a present from Santa so why not put one on a card?  


Koala Santa and Mrs Claus

Sometimes you need a quick and simple card, but why not add a simple frill like a bow to step it up a notch? I used a simple gingham and wrapped an embossed square panel to create a present. Then I colored the Santa Koala and Mrs Claus stamp with Copics. I decided to cut it out with the coordinating die and popped him up on foam tape. To finish it off I added a few gold gems from my stash.

Well, friends, I hope you’re feeling inspired from this post! Tag me on Instagram if you make a project using this as inspiration!! I’d love to see how you made it your own!! Xx, Joy

For more Prickley Pear Stamps inspiration check these out:
Shop
Instagram
Prickley Pear Pals Facebook Page
Prickley Pear Stamps Blog
Pinterest


You can connect with me here:
IG @joywilsonink
Pinterest
Youtube


Bye for now!!! 

Wednesday, July 5, 2023

Collaging Your Stamps to Create a Christmas Scene

 Hey it's Joy and I'm kicking off my Christmas In July by collaging the cuties from the Koala Santa and Mrs Claus stamp set.   You're probably asking what is collaging, are we getting out the modge podge and tearing paper into strips.  Nope... but if that's your thing go for it.  For me it means taking really cute die cut images and layering them up to create a cute little scene.  

Koala Santa and Mrs Claus


I colored the each of the stamped images from the Koala Santa and Mrs Claus set with Copic markers in traditional Christmas colors and then die cut them out with the coordinating dies. I love a lot of layers on my cards, so I used a simple collage method to create the scene. Of course there was some foam tape used to create the dimension. Once it was complete, I thought the top of the card needed a little interest so I stamped one of the Christmas Banner stamps in black and cut it with the Banner die set which comes with three different sizes. I thought it would be fun to cut two of the banners using patterned papers to compliment the colors in my design. But what I love most is the Christmas Banner stamp set because you can create your own patterned paper!


Copic Coloring
Bears W7, 5, 3, 1 R12
Clothing:  R 59, 29, 46, 24  C3, 1
Greens:  YG 67, 63, 61
Gold:  Y 11, 19, 26

Well, friends, I hope you’re feeling inspired from this post! Tag me on Instagram if you make a project using this as inspiration!! I’d love to see how you made it your own!! Xx, Joy


For more Prickley Pear Stamps inspiration check these out:
Shop
Instagram
Prickley Pear Pals Facebook Page
Prickley Pear Stamps Blog
Pinterest

You can connect with me here:
IG @joywilsonink
Pinterest
Youtube

Bye For Now!!!

Wednesday, June 14, 2023

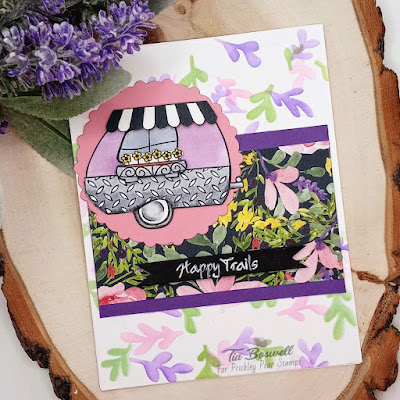
Wednesday June 14th, 2023 Ham Camper CLR068 & Die PPRS-D068


Woot Woo Wednesday Campers! We are one week away from the official start of Summer! Crafty Camp counselor Tia here from RockyMtnCraftia.com ready to create more memories with the Ham Camper stamp and die set!

I used design paper from Carta Bella's Botanical Garden pack and coordinated my colors from there. I don't use stencils a lot, but always good to create outside of your comfort zone.

I selected coordinating ink colors (I used inks from Pink Fresh Studios) and a stencil from The Crafters Workshop (Barberry Buds) to create a fun fresh background. 

For quick card design, I utilized one of Kendra's Card Challenge sketches (#10-sketch 5). I love Prickley Pear Stamps Scallop Circle Nesting - Die Set PPRS-D041, and utilized it for the base of the Ham Camper.

I love that with the Ham Camper stamp set, you can mix and match design elements and make dozens of different camper looks! I achieved the diamond plate metal look by using a silver metallic gel pen on the hatch marks. The flowers and awning I popped up with foam tape, along with a sentiment from the stamp set.

Thanks for following along friends! Get over to the Prickley Pear store and grab those Summer goodies and then get outside and 

Go-Get-Crafty!
-Tia

Friday, June 2, 2023

Friday June 2, 20023 Ham Camper CLR068 & Die PPRS-D068


Hello Friends! Hello lazy days of Summer! Tia here from RockyMtnCraftia.com, sharing with you an iconic image of Summer-the Ham Camper!

Not too long ago I had a great laugh with friends over this name-"Ham Camper". It's named so because of the shape-it's shaped like a hunk-a-ham! And hysterics ensued! Crafty friends really are the BEST!

My card layout is from Kendra's Card Challenge #10. And this is sketch #5. Challenge 10 is wrapping up June 30th, so if you want in on the fun and PRIZES (Prickley Pear Stamps is a Prize Sponsor!) head over and check it out! Cards By Kendra-Kendra's Card Challenges.

The card is A2 sized. I used an embossing folder for the cloud background and design paper from Echo Park. I stamped and die cut my Ham Camper after coloring with Copics. The used Prickley Pear's Scallop Circle Nesting - Die Set PPRS-D041 for the yellow background shape to adhere the camper to. And a big Hello die to welcome all the fun of Summer!

Thanks for stopping in! I hope you have some fun Summer travels planned! Stay safe and when you can-
Go-Get-Crafty!
-Tia

Monday, May 29, 2023

May 29, 2023 Birthday Banners-CLR062D & Build A Cupcake-CLR059


Hello Friends! Tia here from RockyMtnCraftia.com back with more Birthday Banner fun! I really liked the look of my no-line coloring on the last Birthday Banner card I made, so I came back with it again. This time I paired the banners with the yummy Build A Cupcake set!

What I LOVE most about both of these sets is FIRST-they both have DIES! Save yourself some time and frustration and both of these matching dies!!! SECOND-there are additional sets to match those dies! The Banners set comes in Christmas, Halloween, Valentine's and Easter. The Build A Cupcake also has Christmas, Valentines and Fall themed cupcake sets that match the SAME die! This is how you stretch you collection!

Okay, let's get into today's card. I began with an A2 sized card base. I selected birthday paper from my stash. I created a bold frame using Onyx cardstock and a scalloped die. 

I selected the birthday banners-balloons and cupcakes and decided to stamp my sentiment (from the banner set) on a banner. Once again, I stamped everything with Hero Arts Contour Ink which is designed for no-line coloring. 


After building my cupcake, these are the COPIC colors I selected to color everything in.

COPIC SELECTION:
Cupcake Frosting: WO; E50; YR30 and E57; E29
                Wrapper: BG15; BG07;Y13; YR14
Yellow:Y13; Y15; Y17
Orange:YR14; YR68
Red: R35; R46; R37

Fine Lines with: Staedtler Triplus Fineliner: Bright Yellow; Orange, Red, Teal, Light Gray

Lastly, I adhered the base of the banners to the card front, while popping the ends with foam tape. I also adhered the cupcake with foam tape on top of the edges. 

Another fun and fast card that will really show your excitement to celebrate! So until you do...
Go-Get-Crafty!
-Tia


Sunday, May 28, 2023

Slay the Day, But First Tea

Hello Prickley Pear Pals!  Joy here today sharing a bold Tea inspired card.  It's no secret that I have a love affair with Tea and start my day off with it every... single... day!   It was only natural for me to make a card with the Tea Set stamp and of course I paired it with a little honey!  


I colored one of the cups from the Tea set with Copics and then cut it using the Coffee Cup die set. I just love that there are multiple stamp set that fit this die. I thought it would be fun to create a background using a honey comb stencil and Distress Oxide inks. So easy, but it makes the black cup just pop from the page.

I cut this panel down to 3 1/4 x 4 1/2 inches because I thought bold matting layers would add more boldness. I think it came together nicely,. To finish off the card I added twine, enamel dots and a sentiment on a speech bubble. It came together quite nicely, and fast too!

Well, friends, I hope you’re feeling inspired from this post! Tag me on Instagram if you make a project using this as inspiration!! I’d love to see how you made it your own!! Xx, 

For more Prickley Pear Stamps inspiration check these out:
Shop
Instagram
Prickley Pear Pals Facebook Page
Prickley Pear Stamps Blog
Pinterest


You can connect with me here:

IG @joywilsonink
Pinterest
Youtube

Until next time keep crafting!!!


Thursday, May 18, 2023

May 18, 2023 Build A Bird-2 CLR003A


 Hello Friends! Tia here from RockyMtnCraftia.com. I've been gone for a bit (busy remodeling the design studio!) We've had SO much rain over the last week that I just had to make a card to cheer myself up! 

I created a card last month using one of the incredible sketches from Kendra's Card Challenge #10 and the Build-A-Bird-2 stamp set from the Prickley Pear Stamp store. It was so much fun, that I decided to do it again, and flip the card-the way it was sketched!

I embossed my bird with primary red-WOW embossing powder. Using some COPICS to color the bird and match with the wood design paper background. I used one of fellow teammate- Kim Kreates, loopy bows under the bird for some texture. Then decided to stamp my sentiment on a leftover piece of scrap paper and cut it out freehand!

I kept my design vertical as sketch #8 was originally set up as. But, as a reminder-here's the card I did last month where I flipped it-vertically. Love the versatility of these sketches and all the different bird stamps in this set!


I hope that you have a beautiful remainder of your day and thank you so much for stopping by and following along with me! Until next time...

Go-Get-Crafty!

-Tia

Saturday, April 15, 2023

April 15, 2023 - Dinosaur Pals - CLR262

Hi Pals!  I hope that your weekend is off to a roaring good start!  Today, I am sharing a fun card that I created using the adorable Dinosaur Pals stamp set! 

I fell in love with this stamp set ages ago, and it is so much fun to create with!  It comes with tons of elements that you can use to create scenes if you want; however, the little dinosaurs are great as a solo focal image on a card too! 


I colored up the images using Copic Markers and used the coordinating dies to cut them out.  I wanted to create a fun, prehistoric scene for them, so I did some ink blending to create the background.  Once it was dry, I used my markers to create the ground.  
I die-cut a frame from the ink-blended panel and popped it up on a card base using foam dots, and then I adhered the center of the ink-blended panel to the card front, creating some dimension.


Once I had the panels in place, I arranged the elements on the front of the card, and drew in some additional grass to make sure that they were grounded.  I heat embossed the sentiments on black cardstock and created banners and arranged them on the card front, tucking them under the frame.  
Lastly, I popped the two dinosaurs up with foam dots so that they overlapped the frame.

I can't tell you how much fun it was to make this card!  I hope that you love it too!  
Make sure to head over to the shop and check it out! 
Thanks so much for spending a few minutes of your day with me!  
Xoxo, Kim
**Affiliate links have been provided at no additional cost to you.  Thanks so much for supporting my hobby!**

Wednesday, April 12, 2023

Hot Air Balloons Stamp Set: How to Create an Easy Sky Scene

Hello, Joy here with you today.  I am so happy to be joining the Prickley Pear Stamps design team and bring you my first project.   I chose to use the biplane from the Hot Air Balloons stamps set to create a fun and easy summer sky.  


I stamped and colored the Biplane stamp from the Hot Air Balloons stamp set and later this month you'll see a project using the balloons. Now there isn't a coordinating die for the plane so I fussy cut this, but the good news is a Hot Air Balloon die is available in the shop if you're using the balloon!

Do you ever struggle with making a sky? I used to as well, but it is quite easy. Now, you could blend inks using your favorite ink pad and a blending brush or tool, but if you're like me you have your alcohol markers out already. When we think of a sky the first thing we want to do is draw in the clouds, but our paper is already white, right?  The key is to blend several colors of blues and blue greens concentrating the darkest color of blue in the center of the striations you create. I typically start by feathering from the sides of my card panel and alternating each level right to left. Think Zig Zags and always extend the color with your next lightest color. If you find that you have too many brush strokes, you can go over it with your colorless blender to push the color back.

Another key design element I like to have on my cards is a lot of contrast. In this example the red is striking against the black and white background. I also like to repeat elements in increments of threes. For instance, the plane is red and the gingham stripe peeking through on each side creates a triangle of red interest. From there the repetitive use of black and white with the papers and embellishments continue to move the eye. Let me know what you think of the bold sentiment from the Hot Air Balloons stamp set? Isn't it striking?

Copic coloring:
Sky: B00, B000, BG 11, BG10
Plane: R59, 29. 46, 24, C 7, 5, 3, 2, 1, 00 BV 23

We have Olo Markers in the Shop and if you're looking for equivalent colors you can hit me up for some suggestions.  

Well, friends, I hope you’re feeling inspired from this post! Tag me on Instagram if you make a project using this as inspiration!! I’d love to see how you made it your own!! Xx, Joy

For more Prickley Pear Stamps inspiration check these out:
Shop
Instagram
Prickley Pear Pals Facebook Page
Prickley Pear Stamps Blog
Pinterest

Hot Air Balloons
Hot Air Balloon


 You can connect with me, Joy here:

IG @joywilsonink
Pinterest
Youtube

Until next time keep crafting!!!


Wednesday, March 29, 2023

Wednesday March 29, 2023, Rainbow Dreams CLR261 Stamps

Woot Woo Wednesday Friends! Tia here with you from RockyMtnCraftia.com. Today I'm bringing you my love for Rainbows with another of the new stamp sets from the newly released Celestial Collection.
This gorgeous inspiring set is called: Rainbow Dreams.


Rainbow Dreams Clear Stamp Set CLR261

I'm crazy for anything Rainbow! I was so excited when I first saw this set and could not wait to get my hands on it!

I wanted to a card just filled with Rainbows and that's what I did! I took a slim-line card base and added a slim-line scalloped boarder mat in Royal Blue. 

With a 3x8 sized piece of Hammermill Color Copy paper I stamped both the small Rainbow and the large. I used my Misti platform stamper to line up the large Rainbow so only half appeared on each side. Then finished the look with the full Rainbow at the bottom.

I doubled up on my COPIC colors so that I used a lighter shade on top and a darker on the bottom.
I filled in the sky and added some clear Wink-of-Stella to the clouds.

COPIC COLOR LIST:
Red: R39; R35
Orange: YR04; YR07
Yellow: Y04; Y15
Green: G29; G03
Blue: BG01; BG07
Indigo: B24; B18
Purple:V15; V17
Sky: BG000 & BG01


A fast-easy card with a big beautiful message! This is definitely one of those essential stamp sets you need in your stash. Think of it as the 'little black dress' of positive card making! Truly a great way to share some handmade-kindness. Now wildly chase your dreams and...

Go Get Crafty!
-Tia


Tuesday, March 28, 2023

March 28, 2023, You Are My Sunshine Stamp Set CLR268

Hey Y'all!!! Teresa here. You are my sunshine, my only sunshine. You make me happy when skies are gray.... I can sure hear my mom singing that to me when I was little. Be sure to check out the new Celestial Collection at Prickley Pear. You Are My Sunshine is just one stamp set in a beautiful collection. All the details for making this card yourself are below (including links).

I started by stamping and coloring the sun and these cute little sunflowers on Neenah Classic Crest Solar White paper and coloring them with Copic markers.

COPIC MARKERS:

• Sun (Y19, Y18, Y13)

• Flowers (Y19, Y18, Y13, RV09, RV06, RV02, BV17, BV13, BV11, YG67, YG63, YG61)

• Pots (E19, E09, E08, E99, E47, E13, E11)


PAPER & EVERYTHING ELSE

• Neenah Classic Crest Solar White 80lb Paper

• Card Stock - Gorgeous Grape

• Stamp Sets - You Are My Sunshine Clear Stamp Set

• Ink - Polished Pink

• Dies - Slimline Everyday Borders, Tags

• Bearly Art Glue, Foam Tape, Dots


Here is the link for the clear You Are My Sunshine stamp set:

You Are My Sunshine Stamp Set

The card base is cut from Gorgeous Grape card stock. It's cut to 8 1/2" x 5 1/2" scored at 4 1/4" on the long side. Just a tip I learned. Make sure you use your bone folder and burnish the fold well so it doesn't tear the fold.

I cut a piece of beautiful patterned paper to 5 3/8" x 4 1/8". Colors are perfect to be the background for my little sunflower friends. It's glued directly to the card base using wet glue.

I cut a piece of Gorgeous Grape card stock with one of the border dies and popped it up with a piece of foam tape across the bottom edge. The sunflowers are glued flat to the patterned paper behind the fun border and the sun is popped up with foam tape in the upper left corner.

I love all the sentiments that are part of this stamp set. I remember my mom singing 'You Are My Sunshine' to me when I was little. Brought a smile to my face.


The sentiment is popped up with foam tape for some additional dimension.

You are my sunshine, my only sunshine...


Visit the Prickley Pear store HERE


Click below and follow me on Facebook, Instagram & Pinterest!

Instagram / Facebook / Pinterest / Blog


Bring All Your Ideas To Life... ♥

~Teresa of Lollipots 'N' Polkadots


Wednesday, March 8, 2023

March 8, 2023, Peace - Stamp Set CLR277 and Build A Library Stamp Set CLR210

Woot Woo! It's Wednesday Pear Pals! Tia here with you from RockyMtnCraftia.com I'm excited to share my latest creation with you. I call it- Reading is my Peace and Happiness.


Last month Prickley Pear Stamps released the 'PEACE' stamp set. I've had so much fun with it, that I added the 'Build A Library' stamp set with it and came up with this fun layered card.

The Build A Library set is so much fun-it's almost like paper dolls. I first selected a neutral background to create my Library in. I stamped and colored all the room pieces I wanted (and made sure to stamp several extra stacks of books!)

Once I organized all the room pieces the way I wanted, I began adhering with foam tape to several layers of depth. 


 After all my pieces where in place I selected a solid piece of cardstock for my sentiments. I stamped and embossed the 'Peace & Happiness' to help them stand out and grab your attention. 

Using repositionable tape, I glued down the top left corner and then pulled the lower left corner away at an angle. I added several pieces of foam tape underneath to create a little pocket.

I love how it turned out! It's almost as if the book is called Peace & Happiness and someone ripped the cover to reveal the cozy reading nook inside.


It's so much fun to mix and match-up stamp sets! Both the Peace and Build A Library sets are incredibly versatile and FUN! 

I hope I've given you some creative ideas you can try! If you do, make sure to share them on the Prickley Pear Pals Group Facebook page.

Thank for following along! 

Now-Go-Get-Crafty!

-Tia

Friday, March 3, 2023

March 3, 2023 - Happy Beach Critters - CLR220

Hi Prickley Pear Pals!  I am here to share a fun 3-D project that I created using the adorable Happy Beach Critters Stamps and Coordinating Dies.

This is a pop-up shadow-box card that stands on its own and has the cutest little scene inside, but it folds completely flat for mailing. 

I colored the cute little critters with Copic Markers and used the coordinating dies to cut them out.   I assembled the card.  I used some beach themed digital papers for the inside panel, which I tore to create the uneven shoreline.  I adhered the images to acetate and placed them strategically so that they would pop up and out at different heights and depths.
I created a banner for the sentiment which I embellished with a life preserver brad and then adhered it to the card front.  I also created a fun, ratty gingham bow that I embellished with a sunshine brad. 


I can't even tell you how much I love this little card!  I hope it inspires you to get crafty and try something new! 

You can find these little darlings in the shop here!

Thanks so much for spending a few minutes with me! 
Xoxo, Kim

**Affiliate links have been provided at no additional cost to you.  Thank you so much for supporting my hobby!**


Tuesday, February 28, 2023

February 28, 2023, Peace CLR277 Stamps

 Hi crafty friends!  Kim, here, back with another fun card that I created using the new Peace Collection.  This time, I wanted to create a hippie themed mini slimline card, so I focused more on neon colors (a first for me)!

I pulled out my fluorescent Copic markers and worked on finding some color blends that would work and then I set about coloring the images.  Once I was done, I cut them out and set them aside.
I paired a fun tie-dye digital paper with some colored strips and adhered them to my card base.  I added a die-cut heart and a loopy bow and then arranged the images on my card front. 

This card was really out of my comfort zone, but I had SO much fun creating it!  I hope you are inspired to get crafty!   Make sure to head to the shop and check out the new release!  You will not be disappointed! 

Thank you so much for spending a few minutes of your busy day with me!

Xoxo, Kim

**Affiliate links have been provided at no additional cost to you.  Thank you so much for supporting my hobby!**

Tuesday, February 7, 2023

February 7, 2023, Brighter Days Ahead CLR285 Stamps

Hello, Prickley Pear friends!  I am back to share another card that I had the pleasure of creating with the gorgeous Brighter Days Ahead Stamp Set!

Similarly, to the last card that I created, I stamped the image at the base of a vertical panel and I colored the image in with Copic markers.  I used the same mask that I used on the last card and I covered the stamped and colored image so that I could ink blend a beautiful daytime sky with Distress Oxide inks. 
Once I was happy with the sky, I heat embossed the sentiment on a coral panel of card stock and backed it with yellow.  I layered my landscape on the same colors and adhered them to the card base.  Just before adding my sentiment panel to the card, I added a loopy nest of gold thread behind it with mini glue dots.  Lastly, I popped the sentiment panel up with foam dots.
I really love how easy it is to change the look of this stamp set just by changing the color palette.
I hope you love this card as much as I do!  Please make sure and head to the shop to check it out! 
Thank you so much for spending a few minutes with me today!
Xoxo, Kim

**Affiliate links have been provided at no additional cost to you.  Thank you for supporting my hobby!**


Monday, January 30, 2023

January 30, 2023, Dinosaur Pals CLR262 Stamps and PPRS-D262 Dies

 Hello friends!  Kim here with a super fun birthday card that I created using the darling Dinosaur Pals stamps and dies.  I never seem to have enough birthday cards, and so I have been working to build up my stash.  I love that this stamp set is perfect for anyone! 

I started by coloring this little cutie and the greenery with Copic markers and using the coordinating dies to die-cut them. 

I kept my color palette very simple with greens and whites, and I love how the color really pops off of the front of the card.  I used some dies and an embossing folder from my stash to add texture and dimension.

I seriously love this card!  The Dinosaur Pals stamp set is full of cute dinosaurs and some great elements to build a scene.  Stay tuned, as I will be sharing another card that I made soon. 

Make sure to head over to the shop and check it out!  

Thanks so much for spending a few minutes with me!  I hope you have a great day! 

Xoxo, Kim

**Affiliate links provided at no additional expense to you.  Thank you so much for supporting my hobby!**