Showing posts with label Prickley Pear Design Team. Show all posts

Friday, September 8, 2023

September 8, 2023 - Christmas with Spinach and Ramona - CLR288

Happy Friday, Pals!  I hope you have had an amazing week!  Kim here to share another, very different card that I created using the Christmas with Spinach and Ramona stamp set. 

I wanted to show a different way to use this stamp set, so I dug into my toolbox of techniques, and pulled one out from WAY back!  This stamp set has some great smaller stamps included, and I decided to create a background using the smallest snowflake stamp.  I stamped it all over a white card panel using Versamark ink, and I heat embossed it using a glorious sparkly embossing powder. 

I ink blended over the embossed panel using shades of aqua, lavender, and purple.  Once I was happy with the color saturation, I rubbed the embossed areas with a clean tea towel, which removed the ink from the embossed surface.  (If you are not familiar with this technique, it is called Emboss Resist - essentially, the embossing resists the ink.)

I created a beautiful rosette using paper in the same colors and added a loopy white bow and a button to the front of it.  If you wanted to be really fancy, you could adhere the rosette with a removable glue dot, and string a ribbon from it so that it could be used as an ornament.   Lastly, I added a sentiment strip, embossed in the same sparkly powder. 


I really love the non-traditional holiday color palette!  It is so soft and beautiful!  

Thanks so much for spending a few minutes with me. 

Xoxo, Kim

**Affiliate links have been provided at no additional cost to you.  Thanks so much for supporting my crafty hobby!**


Friday, September 1, 2023

September 1, 2023 - Thanks - CLR286

Hello Pals!  Kim back with you today to share another fun card that I created with the Thanks Stamp & Die Bundle.  I had a ton of fun creating this bold card. 

I stamped the different focal images repeatedly on a diagonal across a white card panel, ensuring that I ran the stamp off of the edges to make it look fluid.  I then colored the images using a very strange (for me) color palette of yellow, yellow green, teal, and blue violet. 


I stamped the stitched Thanks on a scrap piece of white and colored it, alternating the colors.  I then used the coordinating die to cut it out.  From a violet panel of card stock, I die-cut the "thanks" twice, and adhered them to the back of the colored thanks, to create a shadow around it. 

I adhered the colored panel to a piece of yellow cardstock and added it to the card base.  I added a loopy white bow behind the focal image and popped it up on foam squares before attaching it to the card front. 


I love how cheerful this card is!  Make sure to head over to the shop and pick up this amazing bundle!  

Thanks so much for spending a few minutes with me! 

Xoxo, Kim

**Affiliate links have been provided at no additional cost to you.  Thank you so much for supporting my crafty hobby!**

Tuesday, August 29, 2023

August 29, 2023 - Thanks - CLR286

 Hi Pals!  Kim here, today, to share a sweet card that I made using the new Thanks Stamp & Die Bundle.  I just love this stamp set, as there are so many fun ways that it can be used. 

I wanted to create a clean and simple card, so I stamped the focal image on a white card panel, followed by the "so much" sentiment and the little dragonfly.  I colored them in with Copic Markers and set the panel aside to dry. 

I adhered a lilac panel of cardstock, along with a coordinating lilac gingham paper to the card base and added the colored panel. I finished off the card by adding a handful of lilac rhinestones. 

I really love the simplicity of this sweet card, and I hope you do too!   Make sure to head to the shop to grab your bundle!  I promise you won't be disappointed.  I will be back in a few days to share another card that I made using this same set in a totally different way! 

Thanks so much for spending a few minutes of your busy day with me today! 

Xoxo, Kim

**Affiliate links have been provided at no additional cost to you.  Thanks so much for supporting my hobby!**

Tuesday, August 22, 2023

August 22, 2023 - Doggone Good Friends - CLR287

 Hello pals!   I hope that you are all enjoying your summer wherever you are!  Kim here today to share a fun friendship themed pop-up box card that I created.

I absolutely LOVE the new Doggone Good Friends stamp set and coordinating dies!  I mean, I really love them!  Beyond being completely adorable, they are perfect for letting that amazing friend - the one that you know is there for you no matter what - know how much you love them! 

I had so much fun coloring this duo up using Copic markers.  I felt like they were made for a fun summery ride, so I die-cut several elements to create my box card scene. 

Amazingly enough, this card was really easy to put together! I just love how these pals are riding off into the sunshine together!  Do you have a sidekick that is your ride or die? 


Thanks so much for hanging out with me for a few minutes!  Make sure to head over to the shop and check out these sweeties!  I promise you won't regret it!  

Xoxo, Kim

**Affiliate links have been provided at no additional cost to you.  Thank you so much for supporting my hobby!**

Sunday, August 13, 2023

August 13, 2023 - Fully Rely On God - CLR290

Hello crafty friends!  Kim here with you today to share a fun card that I created using the BRAND-NEW Fully Rely on God stamp!  I love this sweet little green friend so much!  

I had a lot of fun coloring up this image with Copic markers!  I have a hard time with too much white space, so I added some green ink splatter.  I also inked up the edges of the white panel with the same green ink.

I paired a fun plaid paper with green cardstock, and I adhered them to my card base.  I wrapped iridescent white thread around the stamped panel before added it to the card base. To complete my card, I tied a bow from the same thread and some apple green ribbon.  Using my hot glue gun, I adhered it to the card front and added a white button. 

I hope that you love this adorable stamp as much as I do!  Make sure to "hop" on over to the shop and grab it before it's gone!  It is perfect for bookmarks, tags, cards and so much more! 

Thanks for spending a few minutes with me! 

Xoxo, 

Kim

**Affiliate links provided at no additional cost to you.  Thank you so much for supporting my hobby!**

Thursday, August 10, 2023

August 10, 2023 - Christmas with Spinach and Ramona - CLR

Hello pals!  Kim, here, today to share the card I created using the adorable brand-new Christmas with Spinach and Ramona stamp set.  I hope that you have been loving the design team inspiration so far! 


Frog Pals Spinach and Ramona was the first Prickley Pear stamp set I ever created with and has remained my favorite!  When I found out that my favorite frogs were coming back to celebrate Christmas with us, I was over the moon! 


I colored these cuties with Copic Markers and added some 3D Snow Gel to the snow drifts aand ornaments to add some texture.  To complete the card, I added some snowflake embellishments and, of course, a loopy bow. 
I hope that you love this sweet stamp set as much as I do!  If you are a fan of Spinach and Ramona, grab the Spinach and Ramona Bundle!  It includes the Frog Pals stamps and dies along with the Christmas with Spinach and Ramona stamp set.  Even better, it is discounted!  
Thanks so much for spending a few minutes with me!  
Xoxo, 
Kim

**Affiliate links have been provided at no additional cost to you.  Thanks so much for supporting my hobby!**

Friday, July 28, 2023

July 28, 2023 - You Are Loved Clear Stamp Set CLR282

Hey Y'all!!! It's Christmas in July at Prickley Pear! I can't wait for the real thing. Check out this fabulous tree and these cute little birds decorating it for their special outdoor Christmas. Wouldn't it be fun to be out there with them? The tree and several fun sentiments are part of Prickley Pear's 'You Are Loved' clear stamp set. All the details for making this beautiful card yourself are below (including links).


I started by stamping this beautiful Christmas tree with these fabulous little birds on Neenah Classic Crest Solar White paper and colored them with Copic markers.

COPIC MARKERS:

• Tree & Decorations (YG67, YG63, YG61, Silver Gel Pen, Gold Gel Pen, R46)

• Birds (R46, R27, R24, B26, B24, E79, E74, E71, E70)

• Box & Ornaments (E18, E13, C6, YR23)


PAPER & EVERYTHING ELSE

• Neenah Classic Crest Solar White 80lb Paper

• Card Stock -Basic White

• Stamp Sets - You Are Loved

• Die Sets - Slimline Clouds, Slimline Wavy Edgers, Layering Circles

• Ink - Distress Oxide Salty Ocean, Azure Afternoon

• Miscellaneous - Bearly Art Glue, Foam Tape, Diamond Stickles


Here is the link for the clear You Are Loved stamp set:

You Are Loved Stamp Set

The card base is cut from Basic White card stock. It's cut to 8 1/2" x 5 1/2" scored at 4 1/4" on the long side. Just a tip I learned. Make sure you use your bone folder and burnish the fold well so it doesn't tear the paper.


I cut a piece of Neenah paper and colored it with the Distress Oxide inks that created a beautiful blue sky. The paper I colored is glued flat to the card base using wet glue.

I cut clouds and the snow drifts using the Slimline Clouds and Slimline Wavy Edgers dies. The clouds are glued down flat with wet glue as is the back snow drift. The front two snow drifts are popped up with foam tape to get it some added dimension. Make sure the foam tape is only along the bottom edge of the snow drifts so you have room to layer the fabulous tree between them.


My beautiful tree is layered between the back two snow drifts. Obviously you can layer them however you would like.


You are loved has some fabulous sentiments that you can use to create such fun cards. Deck the Halls is stamped with Azure Afternoon ink and cut out with a scalloped circle. It's popped up with foam tape.

I can't WAIT for Christmas. It's my favorite season?


Visit the Prickley Pear store HERE


Click below and follow me on Facebook, Instagram & Pinterest!

Instagram / Facebook / Pinterest / Blog


Bring All Your Ideas To Life... ♥

~Teresa of Lollipots 'N' Polkadots


Sunday, July 16, 2023

July 16, 2023, Christmas Holiday Gift Tags Clear Stamp Set CLR234

Hey Y'all!!! Merry Christmas in July! All month long we are showcasing Christmas at Prickley Pear. My favorite holiday. Can't wait. Make sure you stay tuned this month to Prickley Pear's blog to see all the wonderful Christmas projects. All the details for making these beautiful tags yourself are below (including links).

I started by stamping these beautiful Christmas images on Neenah Classic Crest Solar White paper and colored them with Copic markers.

COPIC MARKERS:

• Candle, Candy Cane & Bells (R46, R27, R24, YG67, YG63, YG61,Y28, Y26, Y23, B29, B26, B24, Y15, 13, B0000, 0, White Gel Pen)


PAPER & EVERYTHING ELSE

• Neenah Classic Crest Solar White 80lb Paper

• Card Stock - Gold Foil, Silver Foil, Red Foil, Green Textured, Basic White

• Stamp Sets - Christmas Holiday Gift Tags

• Die Sets - Christmas Holiday Gift Tags, Stitched So Sweetly, Nested Tag Dies

• Ink - Real Red, Memento Tuxedo Black

• Ribbon - Red Apple Sparkle, Denim Days Sparkle, Metallic Mesh

• Miscellaneous - Bearly Art Glue, Foam Tape, Double Sided Tape, Glitter Dots


Here are the links for the clear Christmas Gift Tags stamp & die sets:

Christmas Gift Tags Stamp Set

Christmas Gift Tags Die Set


All three tags use the smallest two dies in the Nested Dies set. Obviously you can make them any size you would like with your favorite Christmas colors. I cut three of the 2nd largest die in a shiny gold card stock, a shiny red card stock and a beautiful solid green pattern. These dies have a beautiful edge to them.


All three of the smaller layers were cut using the smallest of the Nested Dies set. Two tags have a shiny silver layer and the candy cane has both a shiny red and a shiny silver layer. They are all glued down flat with wet glue.

Here is the link for the Nested Tag die set:

Nested Tag Die Set

The colored images are all popped up with foam tape right in the center of the tags.


The Christmas Holiday Gift Tag stamp set includes 6 fun holiday sentiments. I choose three different images, stamped them all in Real Red ink and cut them out with a few of my favorite sentiment dies from the Stitched So Sweetly die set.


I added a few sparkly dots and some beautiful ribbon to each tag. You know I love sparkly things.

Merry Christmas in July!

Visit the Prickley Pear store HERE


Click below and follow me on Facebook, Instagram & Pinterest!

Instagram / Facebook / Pinterest / Blog


Bring All Your Ideas To Life... ♥

~Teresa of Lollipots 'N' Polkadots


Wednesday, July 12, 2023

July 12, 2023 Ornaments Set 2-CLR010A


Hello friends, Tia here with you from RockyMtnCraftia.com. Today's card is featuring one of the ornaments from the Ornament Set 2

One of my favorite parts of Christmas is decorating the tree! And I am definitely an ornament collector! From 1st Christmas' for couples & new babies, to ornaments from places we have traveled to and gifts from family and friends. Which is why I guess I love the ornaments stamps sets from Prickley Pear Stamps

I wanted to hang my ornament off of a tree branch, but I don't have one in my stash. Letting the idea roll around in my head, I realized I could create branches from an evergreen tree die in my stash!

After cutting many "limbs", I layered them on my card base. I added a 2nd layer so I could tie thread through the ornament and handing it from a branch.

This ornament set is fabulous for embossing or foiling. Gold glitter embossing was what I chose to do. I just love the details!

To finish off my card I selected a sentiment from the Christmas Trees stamp set, "Joy to the world the Lord is Born." and embossed it as well.

I hope your Christmas in July creations are coming along or that you're getting lots of inspirational ideas! Until next time-Go Get Crafty!

-Tia


Friday, June 30, 2023

June 30, 2023, Snow Ladies Trio Clear Stamp Set CLR233

Hey Y'all!!! The Snow Ladies Trio from Prickley Pear Stamps are so fabulous. I chose two of the three to use on this card. Wouldn't you just love to hang out with them? I would! Can't you imagine what trouble they are getting into? All the details for making this beautiful box yourself are below (including links).

I started by stamping these fun little Snow Ladies on Neenah Classic Crest Solar White paper and colored them with Copic markers.

COPIC MARKERS:

• Ladies (R89, R46, G09, G05, BG57, B0000, YR07, YR04, 100, N1, 0, White Gel Pen)


PAPER & EVERYTHING ELSE

• Neenah Classic Crest Solar White 80lb Paper

• Card Stock - Real Red, Basic White, Silver Foil

• Stamp Sets - Snow Ladies

• Dies - Connected Oval, Stitched So Sweetly

• Ink - Real Red, Memento Tuxedo Black, Distress Oxide (Candied Apple, Lucky Clover)

• Bearly Art Glue, Foam Tape


Here is the link for the clear Snow Ladies stamp set:

Snow Ladies Stamp Set


The card base is cut from Real Red card stock. It's cut to 8 1/2" x 5 1/2" scored at 4 1/4" on the long side. Just a tip I learned. Make sure you use your bone folder and burnish the fold well so it doesn't tear the paper.


I cut a piece of Neenah paper and colored it with the Distress Oxide inks. Just created a random pattern that would show through the holes in the Silver Foil. The paper I colored is glued flat to the back of the paper with the holes in it and the entire piece is glued directly to the card base using wet glue.

I used the Connected Oval die to cut the shape from a piece of Basic White card stock. It's glued with wet glue to the Silver Foil.

My two beautiful Snow Ladies are raised up with foam tape right in the center of the Connected Ovals piece. Obviously you can arrange them however you would like.


Snow Ladies has 6 fabulous sentiments. I stamped 'Merry Christmas' on Basic White card stock using Real Red ink. I cut it out with my Stitched So Sweetly die that I love so much. Creates a great visual with a fun border.

Don't you just wanna hang out with these ladies?


Visit the Prickley Pear store HERE


Click below and follow me on Facebook, Instagram & Pinterest!

Instagram / Facebook / Pinterest / Blog


Bring All Your Ideas To Life... ♥

~Teresa of Lollipots 'N' Polkadots


Wednesday, June 28, 2023

June 28th, 2023 Dainty Dragonflies CLR064 and Dainty Dragonflies Die Set PPRS-D064


Welcome Friends! Tia here with you from RockyMtnCraftia.com. Summer is officially underway and one of my favorite parts of summer as a kid was catching lightening bugs or for some of you Fireflies. So it occurred to me to take the gorgeous Dainty Dragonflies set and create a dreamy nightscape with them.

I started with an A2 sized card base and created my scene on it. I inked the panel with Distress Ink in Faded Jeans, Stormy Sky, Dusty Concord, Victorian Velvet and Spun Sugar. I used white acrylic paint to flick 'stars' across the sky. I then die cut an A2 sized black panel to create a hexagon window and adhered it to my scene. Now, you could draw in the night-plants before, but I chose to do that after my panel was adhered down. To draw the plants I simply used a broad tipped black sharpie.

Now, more of those gorgeous dragonflies! Did I mention that there are 9 dragonflies in the set and in 3 different sizes, so the die set will cut all 9! Brilliant! There are also 2 sets of antennae and two little ladybugs! Seriously, this set is so cute!


After inking in my dragonflies, I layered them with a coat of Wink-a-Stella. Lastly, I die cut the word 'dream' several times with black cardstock. Then glue stacked them together for dimension. Next, I pressed the top layer into VersaMark watermark ink and applied WOW-Metallic Silver Sparkle embossing powder. Now my sentiment outsparkles the dragonflies!

I hope you are having a wonderful summer! Remember to take some time and dream-dream about all the fabulous creations you can make when it's your time to GO GET CRAFTY!

Thanks for following along-see you for Christmas in July!!!

-Tia

Saturday, June 17, 2023

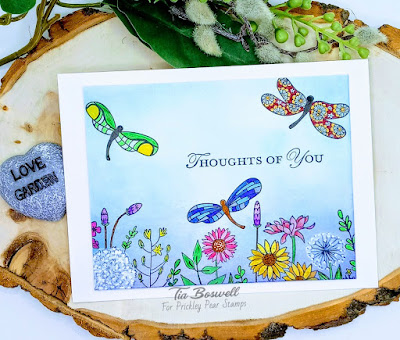
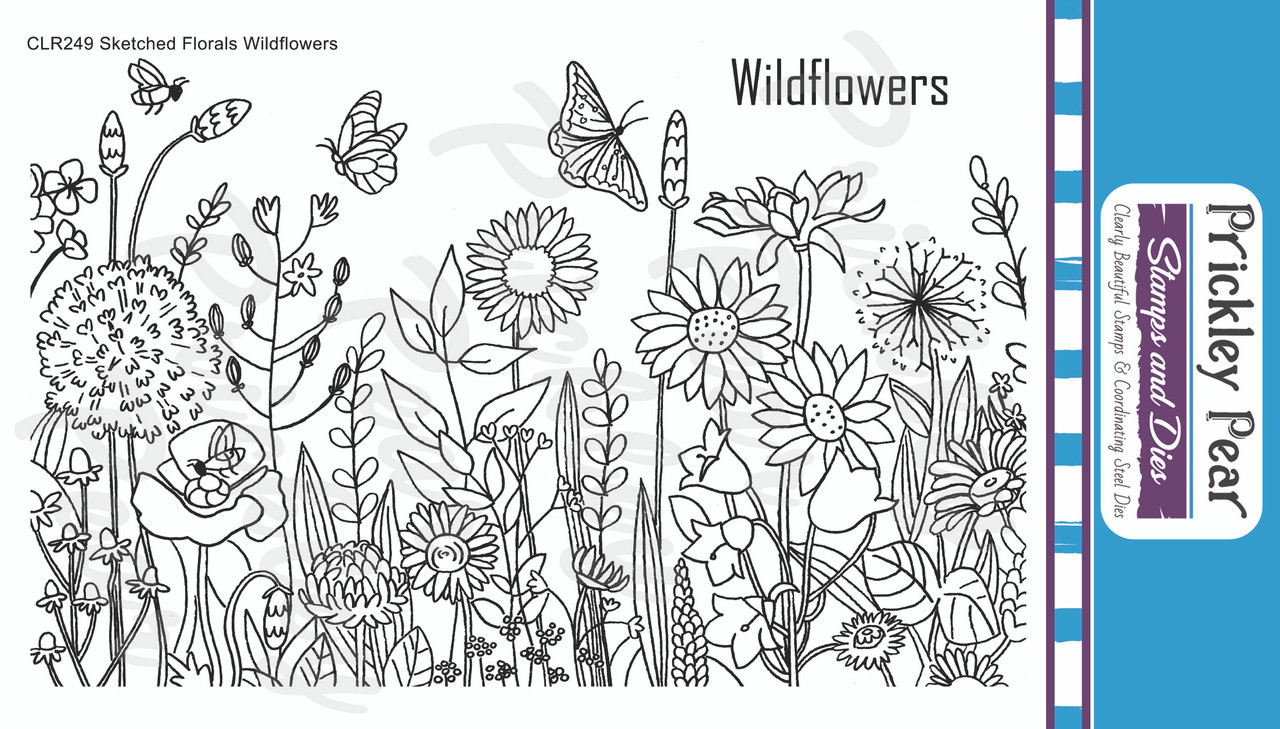
June 17th, 2023 Dainty Dragonflies CLR064 & Wildflowers CLR249


 Happy Saturday friends! Tia here from RockyMtnCraftia.com. Today I'm sharing a great 'all purpose' card for your stash. I used the Dainty Dragonflies and Wildflowers sets to achieve this look.

I love how these two sets come together seamlessly for a natural looking scene. Combined with a simple sentiment this card could be used for any number of situations.


I started with an A6 card base (6.25x4.50) and a cut piece of cardstock at (4.25x5.5) that I used for my scene. Using Distress Inks in Chipped Sapphire and Tumbled Glass I created the background sky. 

Next I stamped the Wildflowers low on my card and used a wet wipe to clear ink away from the butterflies that are are the stamp.

Using my Misti, I selected several of the Dainty Dragonflies to create a circular flow around the card.

It's important to use the right supplies for the right project. And although I am a COPIC girl, this scene is just too dainty for them! This was the perfect project for my Staedtler Triplus Fineliner pens.


Lastly I stamped a sentiment from my collection and mounted the panel with foam tape on the card base. 

There's still one day left in the Prickley Pear Moving Sale-head to the store and pick up these sweet Dainty Dragonflies and pair them with any of the gorgeous floral stamps in the Prickley Pear Store! 

Thanks for following along! Until next time-Go Get Crafty!

-Tia