Showing posts with label Prickley Pear Stamps and Dies. Show all posts

Friday, September 8, 2023

September 8, 2023 - Christmas with Spinach and Ramona - CLR288

Happy Friday, Pals!  I hope you have had an amazing week!  Kim here to share another, very different card that I created using the Christmas with Spinach and Ramona stamp set. 

I wanted to show a different way to use this stamp set, so I dug into my toolbox of techniques, and pulled one out from WAY back!  This stamp set has some great smaller stamps included, and I decided to create a background using the smallest snowflake stamp.  I stamped it all over a white card panel using Versamark ink, and I heat embossed it using a glorious sparkly embossing powder. 

I ink blended over the embossed panel using shades of aqua, lavender, and purple.  Once I was happy with the color saturation, I rubbed the embossed areas with a clean tea towel, which removed the ink from the embossed surface.  (If you are not familiar with this technique, it is called Emboss Resist - essentially, the embossing resists the ink.)

I created a beautiful rosette using paper in the same colors and added a loopy white bow and a button to the front of it.  If you wanted to be really fancy, you could adhere the rosette with a removable glue dot, and string a ribbon from it so that it could be used as an ornament.   Lastly, I added a sentiment strip, embossed in the same sparkly powder. 


I really love the non-traditional holiday color palette!  It is so soft and beautiful!  

Thanks so much for spending a few minutes with me. 

Xoxo, Kim

**Affiliate links have been provided at no additional cost to you.  Thanks so much for supporting my crafty hobby!**


Friday, September 1, 2023

September 1, 2023 - Thanks - CLR286

Hello Pals!  Kim back with you today to share another fun card that I created with the Thanks Stamp & Die Bundle.  I had a ton of fun creating this bold card. 

I stamped the different focal images repeatedly on a diagonal across a white card panel, ensuring that I ran the stamp off of the edges to make it look fluid.  I then colored the images using a very strange (for me) color palette of yellow, yellow green, teal, and blue violet. 


I stamped the stitched Thanks on a scrap piece of white and colored it, alternating the colors.  I then used the coordinating die to cut it out.  From a violet panel of card stock, I die-cut the "thanks" twice, and adhered them to the back of the colored thanks, to create a shadow around it. 

I adhered the colored panel to a piece of yellow cardstock and added it to the card base.  I added a loopy white bow behind the focal image and popped it up on foam squares before attaching it to the card front. 


I love how cheerful this card is!  Make sure to head over to the shop and pick up this amazing bundle!  

Thanks so much for spending a few minutes with me! 

Xoxo, Kim

**Affiliate links have been provided at no additional cost to you.  Thank you so much for supporting my crafty hobby!**

Tuesday, August 29, 2023

August 29, 2023 - Thanks - CLR286

 Hi Pals!  Kim here, today, to share a sweet card that I made using the new Thanks Stamp & Die Bundle.  I just love this stamp set, as there are so many fun ways that it can be used. 

I wanted to create a clean and simple card, so I stamped the focal image on a white card panel, followed by the "so much" sentiment and the little dragonfly.  I colored them in with Copic Markers and set the panel aside to dry. 

I adhered a lilac panel of cardstock, along with a coordinating lilac gingham paper to the card base and added the colored panel. I finished off the card by adding a handful of lilac rhinestones. 

I really love the simplicity of this sweet card, and I hope you do too!   Make sure to head to the shop to grab your bundle!  I promise you won't be disappointed.  I will be back in a few days to share another card that I made using this same set in a totally different way! 

Thanks so much for spending a few minutes of your busy day with me today! 

Xoxo, Kim

**Affiliate links have been provided at no additional cost to you.  Thanks so much for supporting my hobby!**

Tuesday, August 22, 2023

August 22, 2023 - Doggone Good Friends - CLR287

 Hello pals!   I hope that you are all enjoying your summer wherever you are!  Kim here today to share a fun friendship themed pop-up box card that I created.

I absolutely LOVE the new Doggone Good Friends stamp set and coordinating dies!  I mean, I really love them!  Beyond being completely adorable, they are perfect for letting that amazing friend - the one that you know is there for you no matter what - know how much you love them! 

I had so much fun coloring this duo up using Copic markers.  I felt like they were made for a fun summery ride, so I die-cut several elements to create my box card scene. 

Amazingly enough, this card was really easy to put together! I just love how these pals are riding off into the sunshine together!  Do you have a sidekick that is your ride or die? 


Thanks so much for hanging out with me for a few minutes!  Make sure to head over to the shop and check out these sweeties!  I promise you won't regret it!  

Xoxo, Kim

**Affiliate links have been provided at no additional cost to you.  Thank you so much for supporting my hobby!**

Sunday, August 13, 2023

August 13, 2023 - Fully Rely On God - CLR290

Hello crafty friends!  Kim here with you today to share a fun card that I created using the BRAND-NEW Fully Rely on God stamp!  I love this sweet little green friend so much!  

I had a lot of fun coloring up this image with Copic markers!  I have a hard time with too much white space, so I added some green ink splatter.  I also inked up the edges of the white panel with the same green ink.

I paired a fun plaid paper with green cardstock, and I adhered them to my card base.  I wrapped iridescent white thread around the stamped panel before added it to the card base. To complete my card, I tied a bow from the same thread and some apple green ribbon.  Using my hot glue gun, I adhered it to the card front and added a white button. 

I hope that you love this adorable stamp as much as I do!  Make sure to "hop" on over to the shop and grab it before it's gone!  It is perfect for bookmarks, tags, cards and so much more! 

Thanks for spending a few minutes with me! 

Xoxo, 

Kim

**Affiliate links provided at no additional cost to you.  Thank you so much for supporting my hobby!**

Thursday, August 10, 2023

August 10, 2023 - Christmas with Spinach and Ramona - CLR

Hello pals!  Kim, here, today to share the card I created using the adorable brand-new Christmas with Spinach and Ramona stamp set.  I hope that you have been loving the design team inspiration so far! 


Frog Pals Spinach and Ramona was the first Prickley Pear stamp set I ever created with and has remained my favorite!  When I found out that my favorite frogs were coming back to celebrate Christmas with us, I was over the moon! 


I colored these cuties with Copic Markers and added some 3D Snow Gel to the snow drifts aand ornaments to add some texture.  To complete the card, I added some snowflake embellishments and, of course, a loopy bow. 
I hope that you love this sweet stamp set as much as I do!  If you are a fan of Spinach and Ramona, grab the Spinach and Ramona Bundle!  It includes the Frog Pals stamps and dies along with the Christmas with Spinach and Ramona stamp set.  Even better, it is discounted!  
Thanks so much for spending a few minutes with me!  
Xoxo, 
Kim

**Affiliate links have been provided at no additional cost to you.  Thanks so much for supporting my hobby!**

Thursday, July 13, 2023

July 13, 2023 - Christmas Cupcakes - CLR059A

Happy Thursday, pals!  I hope you are having a great week!  Today, I am sharing another project that I created to celebrate Christmas in July!   I may have mentioned this before, but I am just obsessed with the Build-a-Cupcake collection!  I promise this will be my last cupcake card for a little while. 


I had a ton of fun creating this festive Memory Dex card.  I started by die-cutting my dex base three times:  once with a solid card stock for the back, and twice with two different patterned papers.   I cut both of the patterned pieces 1 1/2" from the bottom, and I adhered one piece of each pattern down to the base. 

I colored one of the Christmas Cupcakes with Copic Markers and used the coordinating Build-a-Cupcake Dies to die-cut it.   This coloring adventure was a bit different for me.  I didn't have a good "chocolate" color blend in my repertoire, so I did a little bit of digging and came up with one that required underpainting with a bold blue.  That was a bit terrifying, but I really love the rich chocolate color.  

I die-cut some festive greenery to make a backdrop for the cupcake and created a sentiment banner, which I adhered to the back before adding it to the front of the dex card. 

Lastly, I added a burlap ribbon to the front.  I don't have a clue what you call this sort of "bow that's not a bow."  I stapled the loops to keep them in place, and then I ran a strip of hot glue across the card to make sure that the ribbon stayed put. 


I love all the dimension of this project!  Make sure to head over to the shop and check out this incredible collection!  I have gotten so much mileage out of the coordinating stamp sets and dies.  

Thanks so much for spending a few minutes of your busy day with me! 

Xoxo,  Kim

**Affiliate links have been provided at no additional cost to you.  Thanks so much for supporting my hobby!**


Friday, July 7, 2023

July 7, 2023 - Christmas Cupcakes - CLR059A

 Hello pals!  Kim, here, to help celebrate Christmas in July!  Have you been enjoying the inspiration from the Design Team?  


Today, I am sharing a Christmas card that I made using the Christmas Cupcake Stamp Set.  Are you sensing a theme?  I LOVE this cupcake collection so much!  
I colored the cupcake with Copic Markers, used the coordinating dies and set the images aside.  This coloring was a bit different for me.  I have never colored white icing before, so I was a little worried, but I love how it turned out.

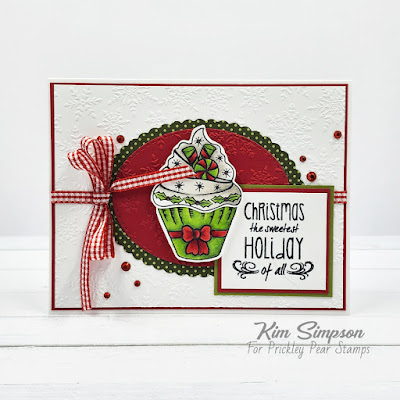
I dry embossed a white panel with snowflakes and backed it with red cardstock.  I wrapped both panels with my very favorite, very old gingham ribbon and adhered it to the card base.  I die-cut a pair of ovals - one from patterned paper and one from red card stock that I embossed with the same snowflakes. 
I stamped the sentiment on white card stock and layered it with red and green.  
I popped the cupcake up on foam dots, added a bow to the side of the oval and a handful or pretty red bling! 

I really love how this card came together!  I can't say enough good things about these beautiful cupcakes!  Please make sure to check them out in the store!  You won't be disappoointed! 
Thank you for spending a few minutes with me!  Have an amazing day! 
Xoxo, Kim
**Affiliate links have been provided at no additional cost to you!  Thank you so much for supporting my hobby!**

Monday, June 12, 2023

June 12, 2023 - Fall Halloween Cupcakes - CLR059C

Happy Monday, friends!  Kim, here, wishing you an amazing start to your week!  I am in love with the amazing Build-A-Cupcake stamps and dies and when I saw all of the different varieties of cupcakes you can make, of course I had to have all of the coordinating stamp sets.  Today, I am sharing a card that I created using the Fall Halloween Cupcake stamp set.   I know summer is barely getting started; however, fall is coming quickly so I thought I would get a jump start on my cards. 

I colored the cupcake topper and the base (two separate images) with Copic markers and set them aside to work on the card base.  I did some very simple paper layering using a fall pad that I have in my stash from last year.

I framed the cupcake with a layered stitched diamond die-cut and adhered it to the card base.  The sentiment is actually cut from the paper pack.  

The coordinating stamp sets include Halloween, Valentine's Day, and Christmas, so stay tuned for more tasty goodness!   

Thanks so much for spending a few moments of your busy day with me!

Xoxo,  Kim

**Affiliate links have been provided at no additional cost to you.  Thank you so much for supporting my hobby!**

Saturday, June 3, 2023

June 3, 2023 - Build-a-Cupcake - CLR059

 Hello, Pals!  Kim, with you today and I can't believe that June has arrived!  Are you ready for summer?  I honestly cannot say that I am ready! 

Today, I am sharing a sweet birthday card that I created using the beautiful Build-a-Cupcake stamps and dies.  This is such a fun collection, with cupcakes for all seasons.  I love that you can mix and match them to create exactly what you need. 

I colored the cupcake and the sentiment using Copic markers, die-cut the image and set them aside.   I wanted to stick with soft, feminine colors, so I used some patterned papers from my stash, and paired them with a soft pink cardstock.  I created a scalloped border using a die in my stash and adhered it to the patterned panel before attaching it to the card base.

I also created an oval as a backdrop for the cupcake, which I adhered to the card base.  I inked the edges of the sentiment panel with yellow ink, and then backed it with a pink panel before popping it up on foam dots.  I used foam dots behind the cupcake so that it would stand out, and I finished my card with some soft pink rhinestones and a loopy bow.


 I hope that you love this card as much as I do!  Please head to the shop and check out this amazing collection of interchangeable stamps and the coordinating dies.  

Thank you so much for spending a few minutes of your day with me!  

Xoxo, Kim

**Affiliate links have been provided at no additional cost to you.  Thank you so much for supporting my hobby!**

Saturday, May 27, 2023

May 27, 2023 - Berry Sweet Fruit Treats Stamp & Die Bundle - CLR212 and PPRS-D212

 Hello Pals!  DT Kim here today, to share another fun card that I created using the yummy Berry Sweet Fruit Treats Stamp & Die Bundle.  

Using Memento Tuxedo Black ink, I stamped the heart image from the set three times and once they were completely dry, I colored them using my Stampin' Blends Markers.  I added a white highlight using a gel pen and cut them out using the coordinating dies. 

I paired the hearts with some fun patterned papers in my stash and used one of the sketches from KCC10.  I really love these hearts!  They added a touch of sweet country flair to my card, and of course, I had to finish it off with a loopy bow and some bling! 

Make sure to head to the shop and check out this Berry Sweet bundle!  I promise that you won't be disappointed! 

Thanks so much for hanging out with me for a few minutes!  I hope you are inspired to get crafty today! 

Xoxo, Kim

**Affiliate links have been provided at no additional cost to you.  Thanks so much for supporting my hobby!**


Wednesday, May 17, 2023

May 17, 2023 - Berry Sweet Fruit Treats - CLR

Hi Prickley Pear friends!  Kim, here, to share a project that I made using one of my favorite stamp and die combos!  I love the Berry Sweet Fruit Treats Stamp and Die Combo!  It reminds me of summer time and enjoying fresh treats outside! 


I created this fun card using another one of the sketches from Kendra's Card Challenge #10 and I just love it!  It gives me all of the farmhouse feels! 

I used some very simple coloring on the images, die-cut them using the coordinating dies, and set them aside. I used an embossing folder in my stash to create the background and I die-cut the circles to create a backdrop for the stamped images.  Lastly, added the banners of patterned paper to hang behind the images. 


I hope that you love this card as much as I do!  Head over to the shop to check out this sweet bundle

Thank you so much for spending a few minutes of your day with me!  I hope you are inspired to get crafty! 

Xoxo, Kim

**Affiliate links have been provided at no additional cost to you. When you shop using my affiliate links, I receive a small commission, which allows me to restock my supplies. Thank you from the bottom of my heart for supporting my hobby!**


Wednesday, May 3, 2023

May 3, 2023 - Spring Flourish Ovals - CLR003

 Hi Prickley Pear Fans!  DT Kim here with you today!  I can't believe May is already here, but I am so happy to see that spring has arrived!  I love seeing the grass plumping up and the flowers beginning to bloom!  Do you have a favorite thing about spring? 

I recently participated in a fun LIVE crafting session with some of my favorite friends, celebrating Prickley Pear and Kendra's Card Challenge!  Did you know that Prickley Pear is a sponsor of Kendra's Card Challenges?    My crafty friends, @LVHandcrafted and @RockyMountainCraftTia all selected sketches from Kendra's latest challenge and paired them with our favorite Prickley Pear items and crafted live on YouTube.  It was so much fun! 

I chose the beautiful Spring Flourish Ovals to pair with Sketch # 2.  I did some very simple coloring, of the image and used the Flourish Oval Die to cut it out. I also used the Flourish Oval Nesting Dies to die-cut some borders for the focal image.

I really love this sketch, as it is so simple but some small details make it really stand out!  You probably don't know this, but I spent a few years in Australia, and I love ALL things related to that amazing country!  When I saw this gorgeous paper with Proteas (the National flower of Australia) all over it, I knew I wanted to use it.  
I paired it with some coordinating cardstock colors, and I dry-embossed the main panel using a folder from my stash. 

Lastly, I added a loopy bow and some beautiful rhinestone embellishments! 
I hope you love this card as much as I do!   Thank you so much for spending a few minutes of your day with me!  Make sure to head to the shop and check out the Flourish Oval Collection!  There is something for every occasion! 
Xoxo, Kim

**Affiliate links have been provided to you at no additional cost.  When you shop using my affiliate links, I receive a small commission on those products, which allows me to replenish my supplies.  Thank you so much for supporting my hobby!**


Wednesday, April 5, 2023

April 5, 2023 - Easter Cross Stamp Set - CLR032B

Hello again, Pals!  I have been dying to share this gorgeous Easter card that I made for my daddy using the Easter Cross Stamp Set.  You may remember that I shared a card using the Crosses 2 Stamp set a few days ago.  I love how these sets all coordinate beautifully together! 

I started by using the same trick that I shared in my previous post - using the negative space from the die-cut as a template for stamping and die-cutting the cross.  It makes lining the die up so easy-peasy!  I also stamped the beautiful lilies at the same time.  I colored the images up with Copic markers and I fussy cut the lilies.  If you know me, you know that was a labor of love for me because I can't stand fussy cutting and will avoid it if at all possible!  

I really wanted the cross to be the star of the show, so I decided to go with a clean and simple look.  I dry-embossed a white panel using one of my favorite embossing folders in my stash and adhered it to the card base.  I stamped the beautiful Hallelujah sentiment on a white strip, and backed it with coral cardstock, which matched the lilies perfectly! 

I spooled some gold metallic thread into a nest on the card front and strategically placed some mini glue dots down where they would be hidden behind the cross and hold the thread in place.  I arranged the lilies on the cross, and I trimmed the stems off of them, before adhering the cross to the card front. 

I know my dad will love this when he receives it and I hope you do too!  Thank you so much for hanging out with me for a few minutes!  

Xoxo, Kim

**Affiliate links have been provided at no additional cost to you.  Thank you so much for supporting my hobby!**

Sunday, April 2, 2023

April 2, 2023 - Crosses 2 - CLR032A

 Good morning, Prickley Pear Pals!  Do you create and send Easter cards?  Today, I am sharing a beautiful Easter card that I created using the Crosses 2 Stamp Set

I absolutely love how simple, but elegant, this collection of beautiful crosses is.  There are three stamp sets along with a coordinating die set and there are sentiments for Easter, Baptism, Communion, and so many others!  In fact, a friend just asked me if I had any ideas for Baptism and First Communion Cards, and I sent her after these stamp sets! 

This really was a fairly simple card to create.  I stamped the cross image and colored with Copic markers.  I die-cut it using the coordinating die and set it aside.  
TIP:  Die-cut the image from a scrap of paper before stamping the image.  Place the piece of card stock that you wish to stamp on BEHIND the panel with the die-cut removed.  The stamp will line up perfectly in the center of the die-cut space, and then once your image has been stamped, you can place the die in the same hole and it will line up perfectly. 

I set my stamped and die-cut image aside to work on the rest of the card elements.  I die-cut an oval from vellum and then I dry-embossed it with a folder from my stash to add some texture to the front of the card.  I also die-cut a slightly larger oval from black card stock. 
I adhered a panel of pink glittery patterned paper backed with black cardstock to the front of my card panel, followed by the black oval.  I stamped my sentiment on a strip of white cardstock and backed it with black.  I created a loopy bow from metallic black embroidery thread, and I adhered it to the back of my cross.  I adhered the cross to the vellum with foam dots which provided me with a hidden place to apply my adhesive to the back of the vellum, which I then adhered to the black oval.

Thank you so much for spending a few minutes with me!  I hope that you are inspired to create something beautiful today!  I would love it if you shared in the comments if your family celebrates Easter, and if you do, how do you celebrate?! 

Xoxo, Kim
**Affiliate links provided at no additional cost to you.  Thank you so much for your support!**

Saturday, March 25, 2023

March 25, 2023 - You Are My Sunshine - CLR268 and Rainbow Dreams - CLR261

 Hi Pals!  Kim, here, to share another card that I created using some of the beautiful new products available in the shop.  Have you been enjoying the new release this week? 


 I had so much fun creating this bright cheerful card!  I combined two of the new stamp sets to - You Are My Sunshine Stamp Set and Rainbow Dreams Stamp Set.

I used lots of masking along with coloring the images with my Copics, which allowed me to create a one-layer image.  

I paired this with one of my favorite patterned papers, which is actually a Christmas paper, and I distressed the edges with a pair of scissors to add some texture to the card.   I finished up with a fun bow, paired with a cloud brad in the center. 

I hope this inspires you to do something crafty!  I am waiting impatiently for summer to come, but for now, this will be my taste of Vitamin D! 

Thanks so much for hanging out with me for a few minutes! 

Xoxo, Kim