Showing posts with label Christmas In July. Show all posts

Friday, July 28, 2023

July 28, 2023 - You Are Loved Clear Stamp Set CLR282

Hey Y'all!!! It's Christmas in July at Prickley Pear! I can't wait for the real thing. Check out this fabulous tree and these cute little birds decorating it for their special outdoor Christmas. Wouldn't it be fun to be out there with them? The tree and several fun sentiments are part of Prickley Pear's 'You Are Loved' clear stamp set. All the details for making this beautiful card yourself are below (including links).


I started by stamping this beautiful Christmas tree with these fabulous little birds on Neenah Classic Crest Solar White paper and colored them with Copic markers.

COPIC MARKERS:

• Tree & Decorations (YG67, YG63, YG61, Silver Gel Pen, Gold Gel Pen, R46)

• Birds (R46, R27, R24, B26, B24, E79, E74, E71, E70)

• Box & Ornaments (E18, E13, C6, YR23)


PAPER & EVERYTHING ELSE

• Neenah Classic Crest Solar White 80lb Paper

• Card Stock -Basic White

• Stamp Sets - You Are Loved

• Die Sets - Slimline Clouds, Slimline Wavy Edgers, Layering Circles

• Ink - Distress Oxide Salty Ocean, Azure Afternoon

• Miscellaneous - Bearly Art Glue, Foam Tape, Diamond Stickles


Here is the link for the clear You Are Loved stamp set:

You Are Loved Stamp Set

The card base is cut from Basic White card stock. It's cut to 8 1/2" x 5 1/2" scored at 4 1/4" on the long side. Just a tip I learned. Make sure you use your bone folder and burnish the fold well so it doesn't tear the paper.


I cut a piece of Neenah paper and colored it with the Distress Oxide inks that created a beautiful blue sky. The paper I colored is glued flat to the card base using wet glue.

I cut clouds and the snow drifts using the Slimline Clouds and Slimline Wavy Edgers dies. The clouds are glued down flat with wet glue as is the back snow drift. The front two snow drifts are popped up with foam tape to get it some added dimension. Make sure the foam tape is only along the bottom edge of the snow drifts so you have room to layer the fabulous tree between them.


My beautiful tree is layered between the back two snow drifts. Obviously you can layer them however you would like.


You are loved has some fabulous sentiments that you can use to create such fun cards. Deck the Halls is stamped with Azure Afternoon ink and cut out with a scalloped circle. It's popped up with foam tape.

I can't WAIT for Christmas. It's my favorite season?


Visit the Prickley Pear store HERE


Click below and follow me on Facebook, Instagram & Pinterest!

Instagram / Facebook / Pinterest / Blog


Bring All Your Ideas To Life... ♥

~Teresa of Lollipots 'N' Polkadots


Monday, July 24, 2023

July 24, 2023, Ham Camper CLR068 Stamps and PPRS-D068 Dies, Ham Camper Winter CLR068B Stamps

Hey everybody! Okay, where has this month gone?! The time is passing by way too fast! We've been sharing 'Christmas in July' projects all month long and I have a fun inspiration project to share featuring the Ham Camper stamps and Ham Camper dies along with the Ham Camper Winter stamps. Having been a full-time RVer for several years, these really speak to me and I just love them! I created an easel type post-it note holder which is both practical and super cute! It just so happened that I had the perfect patterned paper in my stash to park my Christmas camper on!


I cut the easel base from kraft chipboard and a layering panel from a snowy patterned paper. I stamped the camper from the Ham Camper stamps and Ham Camper Winter stamps in black ink on white cardstock and colored it with a variety of markers. I added highlights with a white pen and cut it with the coordinating Ham Camper die. I stamped the sentiment in black ink, trimmed it and adhered it to the top of the easel panel. The finishing touch was adding a few tiny red gemstones. 


Prickley Pear Stamps products used:
Ham Camper stamps
Ham Camper dies
Ham Camper Winter stamps

Thanks so much for stopping by today - we'll see you again soon!

Scrappy hugs,
Leslie
Blog / Facebook / Instagram / Pinterest / Twitter

Sunday, July 16, 2023

July 16, 2023, Christmas Holiday Gift Tags Clear Stamp Set CLR234

Hey Y'all!!! Merry Christmas in July! All month long we are showcasing Christmas at Prickley Pear. My favorite holiday. Can't wait. Make sure you stay tuned this month to Prickley Pear's blog to see all the wonderful Christmas projects. All the details for making these beautiful tags yourself are below (including links).

I started by stamping these beautiful Christmas images on Neenah Classic Crest Solar White paper and colored them with Copic markers.

COPIC MARKERS:

• Candle, Candy Cane & Bells (R46, R27, R24, YG67, YG63, YG61,Y28, Y26, Y23, B29, B26, B24, Y15, 13, B0000, 0, White Gel Pen)


PAPER & EVERYTHING ELSE

• Neenah Classic Crest Solar White 80lb Paper

• Card Stock - Gold Foil, Silver Foil, Red Foil, Green Textured, Basic White

• Stamp Sets - Christmas Holiday Gift Tags

• Die Sets - Christmas Holiday Gift Tags, Stitched So Sweetly, Nested Tag Dies

• Ink - Real Red, Memento Tuxedo Black

• Ribbon - Red Apple Sparkle, Denim Days Sparkle, Metallic Mesh

• Miscellaneous - Bearly Art Glue, Foam Tape, Double Sided Tape, Glitter Dots


Here are the links for the clear Christmas Gift Tags stamp & die sets:

Christmas Gift Tags Stamp Set

Christmas Gift Tags Die Set


All three tags use the smallest two dies in the Nested Dies set. Obviously you can make them any size you would like with your favorite Christmas colors. I cut three of the 2nd largest die in a shiny gold card stock, a shiny red card stock and a beautiful solid green pattern. These dies have a beautiful edge to them.


All three of the smaller layers were cut using the smallest of the Nested Dies set. Two tags have a shiny silver layer and the candy cane has both a shiny red and a shiny silver layer. They are all glued down flat with wet glue.

Here is the link for the Nested Tag die set:

Nested Tag Die Set

The colored images are all popped up with foam tape right in the center of the tags.


The Christmas Holiday Gift Tag stamp set includes 6 fun holiday sentiments. I choose three different images, stamped them all in Real Red ink and cut them out with a few of my favorite sentiment dies from the Stitched So Sweetly die set.


I added a few sparkly dots and some beautiful ribbon to each tag. You know I love sparkly things.

Merry Christmas in July!

Visit the Prickley Pear store HERE


Click below and follow me on Facebook, Instagram & Pinterest!

Instagram / Facebook / Pinterest / Blog


Bring All Your Ideas To Life... ♥

~Teresa of Lollipots 'N' Polkadots


Thursday, July 13, 2023

July 13, 2023 - Christmas Cupcakes - CLR059A

Happy Thursday, pals!  I hope you are having a great week!  Today, I am sharing another project that I created to celebrate Christmas in July!   I may have mentioned this before, but I am just obsessed with the Build-a-Cupcake collection!  I promise this will be my last cupcake card for a little while. 


I had a ton of fun creating this festive Memory Dex card.  I started by die-cutting my dex base three times:  once with a solid card stock for the back, and twice with two different patterned papers.   I cut both of the patterned pieces 1 1/2" from the bottom, and I adhered one piece of each pattern down to the base. 

I colored one of the Christmas Cupcakes with Copic Markers and used the coordinating Build-a-Cupcake Dies to die-cut it.   This coloring adventure was a bit different for me.  I didn't have a good "chocolate" color blend in my repertoire, so I did a little bit of digging and came up with one that required underpainting with a bold blue.  That was a bit terrifying, but I really love the rich chocolate color.  

I die-cut some festive greenery to make a backdrop for the cupcake and created a sentiment banner, which I adhered to the back before adding it to the front of the dex card. 

Lastly, I added a burlap ribbon to the front.  I don't have a clue what you call this sort of "bow that's not a bow."  I stapled the loops to keep them in place, and then I ran a strip of hot glue across the card to make sure that the ribbon stayed put. 


I love all the dimension of this project!  Make sure to head over to the shop and check out this incredible collection!  I have gotten so much mileage out of the coordinating stamp sets and dies.  

Thanks so much for spending a few minutes of your busy day with me! 

Xoxo,  Kim

**Affiliate links have been provided at no additional cost to you.  Thanks so much for supporting my hobby!**


Wednesday, July 12, 2023

July 12, 2023 Ornaments Set 2-CLR010A


Hello friends, Tia here with you from RockyMtnCraftia.com. Today's card is featuring one of the ornaments from the Ornament Set 2

One of my favorite parts of Christmas is decorating the tree! And I am definitely an ornament collector! From 1st Christmas' for couples & new babies, to ornaments from places we have traveled to and gifts from family and friends. Which is why I guess I love the ornaments stamps sets from Prickley Pear Stamps

I wanted to hang my ornament off of a tree branch, but I don't have one in my stash. Letting the idea roll around in my head, I realized I could create branches from an evergreen tree die in my stash!

After cutting many "limbs", I layered them on my card base. I added a 2nd layer so I could tie thread through the ornament and handing it from a branch.

This ornament set is fabulous for embossing or foiling. Gold glitter embossing was what I chose to do. I just love the details!

To finish off my card I selected a sentiment from the Christmas Trees stamp set, "Joy to the world the Lord is Born." and embossed it as well.

I hope your Christmas in July creations are coming along or that you're getting lots of inspirational ideas! Until next time-Go Get Crafty!

-Tia


Monday, July 10, 2023

July 10, 2023, Santa and Rudolph CLR278 Stamps and PPRS-D278 Dies

Hey everybody! Happy Monday! Are the weeks flying by, or is it just me?! Leslie here, sharing another inspiration project featuring the cute-as-a-button Santa and Rudolph stamp set and coordinating Santa and Rudolph die set! This corner fold is part of our design team's 'Christmas in July' showcase and is truly one of the easiest fun folds I've made that stands for display. I've made quite a few of them over the years in roughly an A2 size but I tweaked the measurements a bit and made this one in my mini slimline size of 3-1/2" x 6".  


I cut the card base from white cardstock and layering panels from a Christmas patterned paper. I stamped the sentiment and Santa image from the Santa and Rudolph stamp set in black ink on white cardstock, colored the image with various kinds of markers, and cut it with the coordinating Santa and Rudolph die set. I die cut a rectangle from white cardstock and then cut a slightly larger rectangle (using the paper trimmer) from green cardstock to create the focal panel. I added several clear iridescent gemstones to the corners which completed the card.


Prickley Pear Stamps products used: 
Santa and Rudolph stamp set
Santa and Rudolph die set

Thanks so much for stopping by today - we'll see you again soon!

Scrappy hugs,
Leslie
Blog / Facebook / Instagram / Pinterest / Twitter

Friday, July 7, 2023

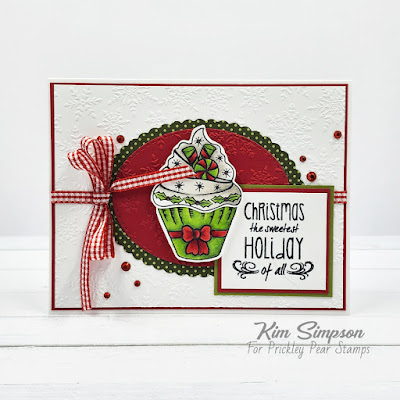
July 7, 2023 - Christmas Cupcakes - CLR059A

 Hello pals!  Kim, here, to help celebrate Christmas in July!  Have you been enjoying the inspiration from the Design Team?  


Today, I am sharing a Christmas card that I made using the Christmas Cupcake Stamp Set.  Are you sensing a theme?  I LOVE this cupcake collection so much!  
I colored the cupcake with Copic Markers, used the coordinating dies and set the images aside.  This coloring was a bit different for me.  I have never colored white icing before, so I was a little worried, but I love how it turned out.

I dry embossed a white panel with snowflakes and backed it with red cardstock.  I wrapped both panels with my very favorite, very old gingham ribbon and adhered it to the card base.  I die-cut a pair of ovals - one from patterned paper and one from red card stock that I embossed with the same snowflakes. 
I stamped the sentiment on white card stock and layered it with red and green.  
I popped the cupcake up on foam dots, added a bow to the side of the oval and a handful or pretty red bling! 

I really love how this card came together!  I can't say enough good things about these beautiful cupcakes!  Please make sure to check them out in the store!  You won't be disappoointed! 
Thank you for spending a few minutes with me!  Have an amazing day! 
Xoxo, Kim
**Affiliate links have been provided at no additional cost to you!  Thank you so much for supporting my hobby!**

Tuesday, July 4, 2023

July 4, 2023, Santa and Rudolph CLR278 Stamps and PPRS-D278 Dies

Hey everybody! Happy Tuesday and Happy Independence Day to America! Leslie here, sharing an inspiration project featuring the most adorable Santa and Rudolph stamp set and coordinating Santa and Rudolph die set! The Prickley Pear Stamps design team is doing 'Christmas in July' and I thought these would be perfect! I sure do love me some fun folds, and this swing flap fun fold might just be my new favorite!


I cut the card base from red cardstock along with layering panels from ivory and a Christmas print. I stamped the deer image from the Santa and Rudolph stamp set in brown ink on ivory cardstock, colored it with alcohol markers and cut it with the coordinating Santa and Rudolph die set. I die cut a square from the red cardstock and a smaller one from the patterned paper, and stamped snow and snowflakes (from the same stamp set) on the smaller one in a very light blue ink. I adhered the layers together and then stamped the sentiment in brown ink at the bottom beneath the focal panel.


I layered a coordinating print on the inside and stamped another sentiment from the same stamp set in brown ink.

Prickley Pear Stamps products used: 
Santa and Rudolph stamp set
Santa and Rudolph die set

Thanks so much for stopping by today - we'll see you again soon!

Scrappy hugs,
Leslie
Blog / Facebook / Instagram / Pinterest / Twitter

Saturday, July 1, 2023

July 1st, 2023 You Are Loved CLR282


Ho,Ho,Ho-Merry Christmas in JULY! We, the design team here at Prickley Pear Stamps are HAPPY to present you with Christmas In July! A month long tribute to inspire and motivate you. Weather you decide to actually start your holiday cards now or just begin gathering some ideas is of course up to you! We're just excited to show you all that you can do with Prickley Pear Rubber Stamps and Dies to create a season filled with love, joy and beauty!

Tia here from RockyMtnCraftia.com, and I'm starting the fabulous month of July off with the 'You Are Loved' clear stamp set.

This gorgeous set with three sentiments, four individual birds and a beautiful large image featuring three birds decorating a Christmas tree. I wanted to try my hand at coloring up that amazing tree. Once done the challenge was in the card layout. 

There is just so much action in this one image, I decided to capture it all-individually! First, I will tell you, I did not color this image three times! I actually colored it once-and really, really took my time doing so! I then color copied it onto my good Hammermill Cardstock (Premium color copy-80lbs). With copies, I could crop and cut to fit into my filmstrip die.

              Here is a close-up from left to right of my slim line card.


   Here I embossed the sentiment on a tag. The squiggly outline was hand drawn by me with a gold gel pen.


This month is going to be so much FUN! Make sure you are back everyday to join us! If you decide to join us and create your own Prickley Pear Christmas In July cards, make sure you post it on the group Facebook page so we can get inspired from you too! 

                        Join us today: https://www.facebook.com/groups/PrickleyPearPals

Thank you so much for following along and I'll be back with another Christmas In July idea for you soon! Until then- GO GET CRAFTY!

    -Tia