Showing posts with label Leslie Turner. Show all posts

Thursday, December 21, 2023

Sending Warm Thoughts Your Way

Hey everybody! Well, only a few more days before Santa arrives... I hope you're ready! I'm just shaking my head at how fast this year has flown by! Leslie here, sharing an inspiration project created with the Snow Ladies Trio stamp set along with the Nesting Tag Dies. I totally love this stamp set and have used all three images and three sentiments in the set to create a double flap fun fold, and I love how it turned out! I always love using non-traditional colors on Christmas cards!


The card bases, inside layering panel and one tag were cut from white cardstock. Another tag was cut from metallic pink cardstock and the layering panels were cut from coordinating prints in a cute plaid paper pad in my stash. I fashioned a bow from some pink gingham ribbon in my stash to embellish the pink tag. I have to say I'm really enjoying these Nesting Tag Dies because each one has a different stitched edge and they are so fun!


All three ladies from the Snow Ladies Trio stamp set were stamped in black ink and colored with alcohol markers, and each one sports a different sentiment. I totally love that different images and sentiments can be used on the multiple layers of this fun fold, providing little surprises for the recipient as each layer is lifted! 


Prickley Pear Stamps products used:
Snow Ladies Trio stamp set
Nesting Tag Dies

Thanks so much for stopping by today - we'll see you again soon!

Scrappy hugs,
Leslie
Blog / Facebook / Instagram / Pinterest / Twitter

Saturday, December 16, 2023

'Tis The Season To Be Jolly

Hey everybody! Happy Saturday! I hope you have something fun planned this weekend... and if you're a crafter, maybe you have some crafting up your sleeve?! I'm definitely doing some of that here today! Leslie here, sharing another inspiration project featuring the Snowflake Pendant die and Snowflake Inserts stamp set. I totally love these because the snowflake is large and definitely takes charge on any project! I love cards with apertures so I cut a large circle in the front flap for the snowflake to show through.


The card base was cut from white cardstock and I used two blue coordinating prints for the front and inside layering panels. I used nested circle dies for the large and small circle die cuts. I adhered three snowflake die cuts together (cut from metallic blue cardstock using the Snowflake Pendant die) which I embellished with blue gemstones. The sentiment from the Snowflake Inserts stamp set was stamped in blue ink. The finishing touch was adding white die cut corners embellished with blue gemstones. 


Prickley Pear Stamps products used:
Snowflake Inserts stamp set
Snowflake Pendant die 

Thanks so much for stopping by today - we'll see you again soon!

Scrappy hugs,
Leslie
Blog / Facebook / Instagram / Pinterest / Twitter

Friday, December 1, 2023

It's the most wonderful time of the year

Hey everybody! Happy Friday AND Happy December 1st! Can you believe it?! Leslie here, with an inspiration project to share with you today featuring the Flourished Oval 3 - Holidays stamp set along with the Flourished Oval Die and Flourished Oval Nesting Dies! This was a super easy (and fun) card to put together with some whimsical Christmas papers I had in my stash.


The card base was cut from white cardstock and layered with a panel cut from a Christmas paper collection in my stash which already had faux lace and off-kilter horizontal flags across the bottom that I thought looked so cute with the stamped snowmen! I used the Flourished Oval 3 - Holidays stamp set along with the Flourished Oval Die and Flourished Oval Nesting Dies to create the focal image. I also used a journaling card from the Christmas paper collection to layer the focal image. The finishing touches were an off-kilter vertical flag cut from a leftover strip and some iridescent gemstones.


Prickley Pear Stamps products used:
Flourished Oval 3 - Holidays stamp set 
Flourished Oval Die 
Flourished Oval Nesting Dies

Thanks so much for stopping by today - we'll see you again soon!

Scrappy hugs,
Leslie
Blog / Facebook / Instagram / Pinterest / Twitter

Tuesday, November 28, 2023

Christmas Tags in Non-Traditional Colors

Hey everybody! We're on the downslide into December and I hope you all had a very happy Thanksgiving! This month has flown by and Christmas is on our heels! Leslie here, sharing a super fun set of Christmas gift tags in non-traditional colors! I used the Christmas Holiday Gift Tags stamp set and Gift Tags Dies along with the Nesting Tag Dies. I pulled out a variety of markers to color these beauties and I love how they turned out! I'm always down for using non-traditional colors for my Christmas projects! 


I stamped all five images from the Christmas Holiday Gift Tags stamp set in gray ink and then again in Versamark, and heat embossed them with clear embossing powder. I used a variety of bold colored markers to color the images, cut them with the coordinating Gift Tags dies and added tiny red gemstones to several of them.I used the Nesting Tag dies and cut a tag from purple, pink, orange, green and gray cardstock. I backed each one with a tag cut from white cardstock, stamped 'To and From' on the back of each one in gray ink, and adhered the images. I punched a 1/4" hole at the top of each tag, threaded a coordinating color ribbon through the hole at the top, and tied it (along with a piece of knotted silver string) with white twine. 


Prickley Pear Stamps products used:
Christmas Holiday Gift Tags stamp set
Gift Tags dies
Nesting Tag dies

Thanks so much for stopping by today - we'll see you again soon!

Scrappy hugs,
Leslie
Blog / Facebook / Instagram / Pinterest / Twitter

Thursday, November 23, 2023

Rotating Center Circle Snowflake Fun Fold

Hey everybody! Today is the day for Giving Thanks and I hope you all have a wonderful day with family and/or friends, and get stuffed to the gills with yummy food, lol! Leslie here, with an inspiration project to share featuring the Snowflake Pendant die and Snowflake Inserts stamp set! OMGosh, these are some ah-maazing products which I quickly fell in love with! And this rotating center circle fun fold was a blast to make and it didn't take me long to make a couple more! I'm happy to share the video where my inspiration came from HERE if you're interested. It looks complicated but it isn't really, and it sure packs a punch!


The square card base was cut from teal cardstock and I used some pretty snowfall 6x6 double-sided papers for the layering panels. I layered two snowflake die cuts together (cut from dark and medium teal shimmer cardstock using the Snowflake Pendant die) and stamped the sentiment from the Snowflake Inserts stamp set on light teal cardstock in teal ink. I used some ephemera alpha stickers in my stash for the 'Deck the Halls' sentiment on the frame along with quite a few embellishments and sequins in my stash to give it lots of bling. 


Here's a few-second video showing what it looks like opening and closing. I L-O-V-E it!


Prickley Pear Stamps products used:
Snowflake Pendant die 
Snowflake Inserts stamp set

Thanks so much for stopping by today - we'll see you again soon!

Scrappy hugs,
Leslie
Blog / Facebook / Instagram / Pinterest / Twitter

Wednesday, November 15, 2023

Tone-On-Tone NOEL

Hey everybody! Happy Wednesday - I hope you're having a wonderful week! Leslie here, sharing an inspiration project featuring the beautiful Christmas Trees 2 stamp set and Tree die! There are SO many options for creating pretty projects with these stamps! I chose to do a tone-on-tone mini slimline using the trees to spell out NOEL, and I love how it turned out! I spritzed some chameleon powder mixed with water over the white heat embossed trees just to give them a little color!


I cut a 3-1/2" x 6" mini slimline card base from white cardstock along with a three-layer die cut frame (using a frame die in my stash) from a white shimmer cardstock. I reserved the inner portion of one of the frame die cuts to put back into the center when assembling the card front. I stamped one of the trees from the Christmas Trees 2 stamp set four times on the white shimmer cardstock and heat embossed them with white embossing powder. I spritzed some chameleon powder mixed with water in a mini mister over the white heat embossed trees and then once dry added the N-O-E-L letters cut from the white shimmer cardstock using some alpha dies in my stash. I adhered the trees to the card front using 1/2" double-sided foam strips and added several gemstones. 


Prickley Pear Stamps products used:
Christmas Trees 2 stamp set 
Tree die

Thanks so much for stopping by today - we'll see you again soon!

Scrappy hugs,
Leslie
Blog / Facebook / Instagram / Pinterest / Twitter

Friday, November 3, 2023

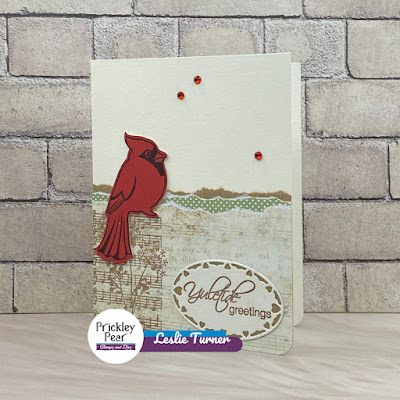
November 3, 2023, Cardinals CLR005 Stamps, Cardinals 2 CLR005A Stamps and Cardinal PPRS-D005 Die

Hey everybody, happy Friday! I'm still working on Christmas projects which I do all year long. How about you... have you started on them, are you plugging away, or are you finished? Leslie here, sharing an inspiration project featuring the absolutely gorgeous Cardinals and Cardinals 2 stamp sets along with the coordinating Cardinal die and the Heart Oval Insert die. This CAS-ish vintage card is a super simple design that would be so easy to mass produce for everybody on your Christmas list.


I cut a standard A2 size side-folding card base from ivory cardstock along with layering panels from kraft paper and two coordinating patterned papers. I tore the top edge of the three layering panels and adhered them to the card base. I stamped the floral music image from the Cardinals stamp set on the left edge and the sentiment from the Cardinals 2 stamp set on a scrap piece of ivory cardstock, both in brown ink, and cut the sentiment with the Heart Oval Insert die. I traced around the outside edge of the oval die cut with a pencil onto a scrap piece of kraft paper, hand-cut it just inside the tracing line, and adhered it behind the die cut. I stamped the cardinal in black ink on red cardstock and cut it with the coordinating Cardinal die. I die cut two additional cardinals and adhered them on top of one another for a little dimension, and then adhered them to the card front. The finishing touch was adding several small red gemstones.


Prickley Pear Stamps products used:
Cardinals stamp set 
Cardinals 2 stamp set
Cardinal die
Heart Oval Insert die

Thanks so much for stopping by today - we'll see you again soon!

Scrappy hugs,
Leslie
Blog / Facebook / Instagram / Pinterest / Twitter

Tuesday, October 31, 2023

October 31, 2023, Ornaments 2 CLR010A Stamps

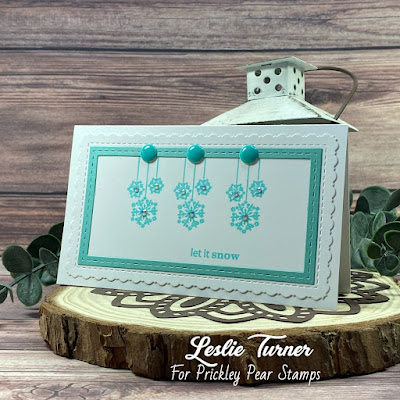
Hey everybody! Are you ready (or getting ready) for Christmas? I've been making Christmas cards all year long and I'm still making them! Leslie here, sharing another inspiration project featuring the beautiful Ornaments 2 stamp set. I created a mini slimline featuring three clusters of hanging snowflakes and I really love how it turned out!


I cut a 3-3/4" x 6" mini slimline card base from white cardstock. Using a mini slimline fancy scalloped die in my stash, I cut a white panel for the front. I also cut a frame from teal cardstock using a frame die in my stash. I stamped three clusters of hanging snowflakes and a sentiment from the 
Ornaments 2 stamp set in teal ink. I added teal gemstones to the center of each snowflake, and the finishing touch was adding several teal enamel dots.


Prickley Pear Stamps products used:
Ornaments 2 stamp set

Thanks so much for stopping by today - we'll see you again soon!

Scrappy hugs,
Leslie
Blog / Facebook / Instagram / Pinterest / Twitter

Sunday, October 22, 2023

October 22, 2023, Scary Cats 2 CLR017A Stamps

Hey everybody! It's a beautiful Sunday and I hope you're having a great weekend! Leslie here, sharing a center easel card! I totally love fun folds and this one is so easy and works up fast. I used the Scary Cats 2 stamp set which I paired with pink patterned papers in my stash.

I cut the A2 size card base from white cardstock and covered the panels with pink plaid, polka dot and floral patterned papers. I stamped the day of the dead cat from the Scary Cats 2 stamp set in black ink on white cardstock, colored the flowers on her head and face with alcohol markers, and fussy cut her. 


I adhered the cat to the center panel, stamped the sentiment in black ink, and added a few gemstones. The final step was adding a 'stop' for the center easel to rest on. I created this by stamping the circular cluster of flowers (in the same stamp set), coloring them with alcohol markers, and punching the cluster with a 1" circle punch. I then layered it on several more punched circles to give it some dimension.


Prickley Pear Stamps products used:
Scary Cats 2 stamp set

Thanks so much for stopping by today - we'll see you again soon!

Scrappy hugs,
Leslie
Blog / Facebook / Instagram / Pinterest / Twitter

Wednesday, October 18, 2023

October 18, 2023, Ornaments 2 CLR010A Stamps

Hey everybody! Happy Wednesday - I hope you're having a fantastic week! Leslie here, sharing an inspiration project featuring the Ornaments 2 stamp set! I created a pretty clean and simple Christmas card that would be super easy to mass-produce. This stamp set is perfect for creating a CAS card. There are several different ornaments in this set that you can stamp by themselves or group together.


I cut a standard A2 size side-folding card base from white cardstock. I stamped an ornament from the Ornaments 2 stamp set in brown ink on a scrap piece of white cardstock and cut it in a diamond shape using a stitched mini scallop die in my stash. I used a gold pen to draw a hanger on the ornament and then layered it on a small panel of gold foil cardstock. I stamped the sentiment in brown ink and added several gold pearls.


Prickley Pear Stamps products used:
Ornaments 2 stamp set

Thanks so much for stopping by today - we'll see you again soon!

Scrappy hugs,
Leslie
Blog / Facebook / Instagram / Pinterest / Twitter

Monday, October 9, 2023

October 9, 2023, Scary Cat & Bats CLR017 Stamps

Hey everybody! Happy Monday - I hope you had a great weekend! Leslie here, sharing a super cute almost-one-layer card featuring a cat and two bats from the Scary Cat & Bats stamp set that I paired with some digital Halloween paper in my stash. This is a super easy design in traditional Halloween colors that packs a punch!

I already had several patterns of the digital Halloween paper (printed on 65# Hammermill copy paper) out on my desk from another project, so I cut two pieces into rectangles and then diagonally into long triangles. I cut a standard A2 size top-folding card base and rounded the bottom right corner. 


I adhered two of the long triangles to the left side, then stamped the sentiment in purple ink in the upper right corner. I stamped the cat and two bats from the Scary Cat & Bats stamp set in black ink, and that completed the card. Easy peasy!


Prickley Pear Stamps products used:
Scary Cat & Bats stamp set

Thanks so much for stopping by today - we'll see you again soon!

Scrappy hugs,
Leslie
Blog / Facebook / Instagram / Pinterest / Twitter

Thursday, October 5, 2023

October 5, 2023, You Warm My Heart Digital Card Kit

Hey everybody! Happy Thursday - I hope you're having a great week! Leslie here, sharing an inspiration project featuring the new You Warm My Heart digital card kit created 'on the fly' by Prickley Pear Stamps artist, Kayla Ruble, for Joy to use for her live today at the 2023 Virtual Makers Retreat! What a great job this artist did in record time! This sweet digital card kit includes two black and white line images, two pre-colored images, snowflake and heart background paper, and a sentiment panel. I used the kit to create an adorable holiday gate fold card!

Be sure to pop over and check out the happenings at the Makers Retreat going on October 3-7! Before I get to my project details, here are a few links that will surely come in handy:
Sign Up for the Makers Retreat
Makers Retreat Schedule
Prickley Pear Stamps Live Stream (
today, October 5, at 2:00 PM Central Time)


I cut a standard A2 size gate fold card base from white cardstock along with layering panels from red cardstock and the background paper in the digital card kit which I printed on white cardstock. I created a layered oval focal element using stitched oval dies in my stash along with the sentiment panel in the kit and the red cardstock, and adhered a fussy cut pre-colored image. I affixed red and white polka dot washi tape to white cardstock strips which I adhered on both sides. The finishing touch was adding several iridescent gemstones to the snowflakes. 


I cut the inside panel from white cardstock and embellished it with a blue cardstock strip and a washi tape strip. I stamped a sentiment from the Santa Koala and Mrs Claus stamp set in black ink which completed the card. 


Prickley Pear Stamps products used:
You Warm My Heart Digital Card Kit
Santa Koala and Mrs Claus Stamp Set

Thanks so much for stopping by today - we'll see you again soon!

Scrappy hugs,
Leslie
Blog / Facebook / Instagram / Pinterest / Twitter

Friday, September 22, 2023

September 22, 2023, Thanks CLR286 Stamps and PPRS-D286 Dies

Hey everybody! Happy Friday! The weekends sure seem to be coming around quickly these days! Leslie here, sharing another inspiration project featuring the new Thanks stamp set and coordinating Thanks die set! I created a mini slimline employing the raised inlaid die cut technique which I think always turns out so cool! These are amazing stamps and dies, and the large sentiment works perfectly for this technique and for a mini slimline card!


I cut a 3-3/4" x 6" mini slimline card base from ivory cardstock. I then cut a layering panel from a fabric look patterned paper, die cut the large sentiment from the Thanks die set into the center of the panel, and adhered it to the card front on double-sided foam strips. I stamped the Thanks sentiment from the Thanks stamp set in dark green ink on a piece of ivory cardstock and colored it with alcohol markers. I die cut it with the coordinating die and adhered it into the negative space of the panel on the card front. I stamped the remainder of the sentiment on an ivory cardstock scrap, trimmed it and adhered it beneath the sentiment. The finishing touch was stamping the dragonfly on an ivory cardstock scrap in black ink which I colored, die cut and adhered to the upper left of the sentiment. 


Prickley Pear Stamps products used:
Thanks stamp set
Thanks die set

Thanks so much for stopping by today - we'll see you again soon!

Scrappy hugs,
Leslie
Blog / Facebook / Instagram / Pinterest / Twitter

Friday, September 15, 2023

September 15, 2023, Doggone Good Friends CLR287 Stamps and PPRS-D287 Dies

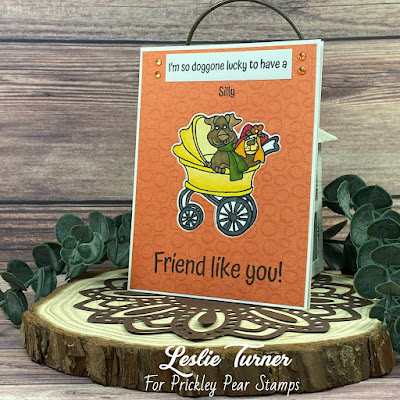
Hey everybody! Another week is almost behind us and we've once again quickly landed on Friday... but that's not a bad thing! Leslie here, sharing an inspiration project featuring the super adorable new Doggone Good Friends stamps and coordinating Doggone Good Friends dies! I'm sure everybody has that silly 'ride or die' friend who would appreciate a card made with these products! I've once again employed the inlaid die cut window technique for this fun friendship card, and I'm thrilled with how it turned out!


I cut a standard A2 size side-folding card base from white cardstock along with a layering panel from a mango colored patterned paper. I adhered the patterned paper to the card base avoiding adhesive on the center portion where I planned to die cut an aperture for the inlay. Using a die from the Doggone Good Friends die set, I cut an aperture into the front flap of the card base, reserving the white cardstock negative space piece for stamping the focal image from the Doggone Good Friends stamp set.

I colored the image with alcohol markers and cut it with the coordinating Doggone Good Friends die. I stamped the first part of the sentiment on a scrap piece of white cardstock in black ink, trimmed it and adhered it across the top of the card front. I stamped the other two parts of the sentiment directly on the card front and added several clear iridescent gemstones which I colored with an alcohol marker. 


I cut layering panels and an embellishing strip for the inside from additional mango colored patterned papers, and adhered the focal image through the aperture onto the inside panel. Such a fun card! 


Prickley Pear Stamps products used:
Doggone Good Friends stamp set
Doggone Good Friends die set

Thanks so much for stopping by today - we'll see you again soon!

Scrappy hugs,
Leslie
Blog / Facebook / Instagram / Pinterest / Twitter

Monday, September 11, 2023

September 11, 2023, F.R.O.G. - Fully Rely On God CLR290 Stamps

Hey everybody! Happy Monday - I hope you have a great week coming up! Leslie here, with another inspiration project featuring the new F.R.O.G. - Fully Rely On God mini 3x3 stamp set! What a powerful message from our sweet little Ramona, and I have to say that I humbly do this every day! I used some gorgeous digital papers in my stash for this simple A2 card which I paired with ivory and pink cardstock.


I cut a standard A2 size side-folding card base from ivory cardstock and then die cut stitched rectangles from from a floral digital paper (printed on ivory), pink and ivory cardstock using a stitched rectangle die in my stash. I stamped the F.R.O.G. - Fully Rely On God image on the ivory stitched rectangle and colored it with a variety of markers. I cut a double-ended flag strip from a coordinating digital paper and layered it on ivory cardstock. I assembled the card, popping the focal panel up on foam strips, and added several purple gemstones which completed the card. 


Prickley Pear Stamps products used:
F.R.O.G. - Fully Rely On God mini 3x3 stamp set

Thanks so much for stopping by today - we'll see you again soon!

Scrappy hugs,
Leslie
Blog / Facebook / Instagram / Pinterest / Twitter

Sunday, September 10, 2023

September 10, 2023, Christmas with Spinach and Ramona CLR288 Stamps

Hey everybody! Can you believe how fast the time is flying?! We're already headed into the middle of September! Leslie here, sharing an inspiration project featuring the new Christmas with Spinach and Ramona stamp set! This is one of the cutest stamp sets I have ever had in my hands and I created an inverted standing triple panel card to show off these adorable little critters!


I cut the card base and front panel from white 12x12 cardstock. I stamped the image from the Christmas with Spinach and Ramona stamp set on the front panel and colored it with alcohol markers, adding some accents with metallic pens. I stamped snowflakes all over the card base and front panel and added clear iridescent gemstones to the center of random snowflakes for some pretty sparkle. I stamped the sentiment on white cardstock, trimmed it into three strips, and added it to the front which completed the card. 


Prickley Pear Stamps products used:
Christmas with Spinach and Ramona stamp set

Thanks so much for stopping by today - we'll see you again soon!

Scrappy hugs,
Leslie
Blog / Facebook / Instagram / Pinterest / Twitter

Monday, September 4, 2023

September 4, 2023, Scary Cats 2 CLR017A Stamps

Hey everybody! It'll soon be Halloween and I'm still playing with scary cats and bats! Leslie here, sharing a fun Halloween card featuring a Cheshire-type cat in the Scary Cats 2 stamp set! This was such a fun and easy card to put together, and would be a great design to mass-produce if you send out a lot of Halloween Cards, and especially if you're an Alice in Wonderland fan! ;)


I cut a standard A2 size top-folding card base from white cardstock and a layering panel from red striped pattern paper. The striped pattern to match the cat was just the ticket! I rounded the bottom right corner on both the card base and the layering panel, and then stamped the cat from the Scary Cats 2 stamp set on white cardstock. I cut him at an angle with an oval die and then cut a slightly larger oval to offset behind the cat. I stamped the sentiment (from the same stamp set) and added several black enamel dots to complete the card. 


Prickley Pear Stamps products used:
Scary Cats 2 stamp set

Thanks so much for stopping by today - we'll see you again soon!

Scrappy hugs,
Leslie
Blog / Facebook / Instagram / Pinterest / Twitter

Monday, August 21, 2023

August 21, 2023, Thanks CLR286 Stamps and PPRS-D286 Dies

Hey everybody! Well, another Monday has rolled around which means another weekend bit the dust! Hope you had a good one! Leslie here, sharing a tri-fold thank you card featuring the new Thanks stamp set and coordinating Thanks die set. It's been a minute since I made a tri-fold card and this one has panels on it rather than the typical slanted edge. I can't say enough about these stamps and dies. Everybody needs thank you cards in their stash and those with a large sentiment sure speak volumes!


I cut a basic tri-fold card base from ivory cardstock along with a layering panel from a floral print. I stamped the large sentiment, two butterflies and a dragonfly from the Thanks stamp set on ivory cardstock and colored them with alcohol markers. I fussy cut the letters and die cut the butterflies and dragonfly with the coordinating dies in the Thanks die set


Using stitched oval dies in my stash, I die cut three ovals for each of the panels from ivory cardstock and additional floral prints, layered them and adhered them to the card base. I added the main sentiment to the first panel and stamped the remaining parts of the sentiment as well as leaf images (from the same stamp set) on the two subsequent panels. I embellished the front panel with a duplicate fussy cut floral image popped up on small foam pads and one of the butterflies, then added the other butterfly and the dragonfly to the other panels. The finishing touch was adding clear iridescent gemstones (colored with an alcohol marker) to each of the panels.


Prickley Pear Stamps products used:
Thanks stamp set
Thanks die set

Thanks so much for stopping by today - we'll see you again soon!

Scrappy hugs,
Leslie
Blog / Facebook / Instagram / Pinterest / Twitter

Tuesday, August 15, 2023

August 15, 2023, Doggone Good Friends CLR287 Stamps and PPRS-D287 Dies

Hey everybody! Happy Tuesday - I hope you're having a great week so far! Leslie here, sharing an inspiration project featuring the NEW Doggone Good Friends stamp set with coordinating Doggone Good Friends die set! These are such fun products, I can't even begin to tell you how much I enjoyed creating this friendship card!


I cut a standard A2 size side-folding card base and layering panel from white cardstock. I applied strips of wide road and grass washi tape on the layering panel to create the background. I stamped the image from the Doggone Good Friends stamp set in black ink on white cardstock, colored it and cut it with the coordinating Doggone Good Friends die set. I added the stamped sentiment which completed the card. 


Prickley Pear Stamps products used:
Doggone Good Friends stamp set
Doggone Good Friends die set

Thanks so much for stopping by today - we'll see you again soon!

Scrappy hugs,
Leslie
Blog / Facebook / Instagram / Pinterest / Twitter

Saturday, August 12, 2023

August 12, 2023, F.R.O.G. - Fully Rely On God CLR290 Stamps

Hey everybody! Happy Saturday - I hope you're having a good weekend! Leslie here, sharing a tag/bookmark featuring our new F.R.O.G. - Fully Rely On God stamp set. It's a small 3x3 stamp set but sure packs a big punch... I totally love our little Ramona!


I cut two tag/bookmark bases from white cardstock and stamped the Ramona image from the F.R.O.G. - Fully Rely On God stamp set on one of them. I colored it with an assortment of markers, and added three strips of skinny washi tape and several green dot sparklers. I adhered the second tag to the back of the first one for a clean finish, and added hole reinforcements that I created with 1/2" and 1/4" circle punches and a scrap piece of green cardstock. I looped three pieces of ribbon through the hole and secured it with a white twine bow. 


Prickley Pear Stamps products used:
F.R.O.G. - Fully Rely On God stamp set

Thanks so much for stopping by today - we'll see you again soon!

Scrappy hugs,
Leslie
Blog / Facebook / Instagram / Pinterest / Twitter