Showing posts with label Ornaments 2 stamp set. Show all posts

Tuesday, October 31, 2023

October 31, 2023, Ornaments 2 CLR010A Stamps

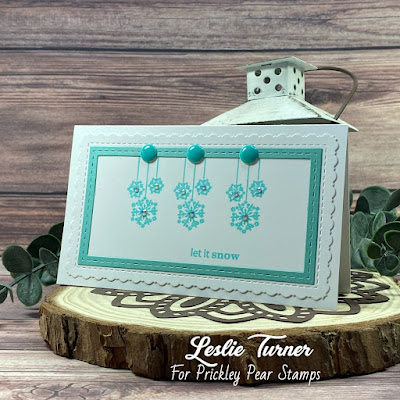
Hey everybody! Are you ready (or getting ready) for Christmas? I've been making Christmas cards all year long and I'm still making them! Leslie here, sharing another inspiration project featuring the beautiful Ornaments 2 stamp set. I created a mini slimline featuring three clusters of hanging snowflakes and I really love how it turned out!


I cut a 3-3/4" x 6" mini slimline card base from white cardstock. Using a mini slimline fancy scalloped die in my stash, I cut a white panel for the front. I also cut a frame from teal cardstock using a frame die in my stash. I stamped three clusters of hanging snowflakes and a sentiment from the 
Ornaments 2 stamp set in teal ink. I added teal gemstones to the center of each snowflake, and the finishing touch was adding several teal enamel dots.


Prickley Pear Stamps products used:
Ornaments 2 stamp set

Thanks so much for stopping by today - we'll see you again soon!

Scrappy hugs,
Leslie
Blog / Facebook / Instagram / Pinterest / Twitter

Wednesday, October 18, 2023

October 18, 2023, Ornaments 2 CLR010A Stamps

Hey everybody! Happy Wednesday - I hope you're having a fantastic week! Leslie here, sharing an inspiration project featuring the Ornaments 2 stamp set! I created a pretty clean and simple Christmas card that would be super easy to mass-produce. This stamp set is perfect for creating a CAS card. There are several different ornaments in this set that you can stamp by themselves or group together.


I cut a standard A2 size side-folding card base from white cardstock. I stamped an ornament from the Ornaments 2 stamp set in brown ink on a scrap piece of white cardstock and cut it in a diamond shape using a stitched mini scallop die in my stash. I used a gold pen to draw a hanger on the ornament and then layered it on a small panel of gold foil cardstock. I stamped the sentiment in brown ink and added several gold pearls.


Prickley Pear Stamps products used:
Ornaments 2 stamp set

Thanks so much for stopping by today - we'll see you again soon!

Scrappy hugs,
Leslie
Blog / Facebook / Instagram / Pinterest / Twitter

Wednesday, July 12, 2023

July 12, 2023 Ornaments Set 2-CLR010A


Hello friends, Tia here with you from RockyMtnCraftia.com. Today's card is featuring one of the ornaments from the Ornament Set 2

One of my favorite parts of Christmas is decorating the tree! And I am definitely an ornament collector! From 1st Christmas' for couples & new babies, to ornaments from places we have traveled to and gifts from family and friends. Which is why I guess I love the ornaments stamps sets from Prickley Pear Stamps

I wanted to hang my ornament off of a tree branch, but I don't have one in my stash. Letting the idea roll around in my head, I realized I could create branches from an evergreen tree die in my stash!

After cutting many "limbs", I layered them on my card base. I added a 2nd layer so I could tie thread through the ornament and handing it from a branch.

This ornament set is fabulous for embossing or foiling. Gold glitter embossing was what I chose to do. I just love the details!

To finish off my card I selected a sentiment from the Christmas Trees stamp set, "Joy to the world the Lord is Born." and embossed it as well.

I hope your Christmas in July creations are coming along or that you're getting lots of inspirational ideas! Until next time-Go Get Crafty!

-Tia


Friday, October 22, 2021

Fun fold with Ornament focal!

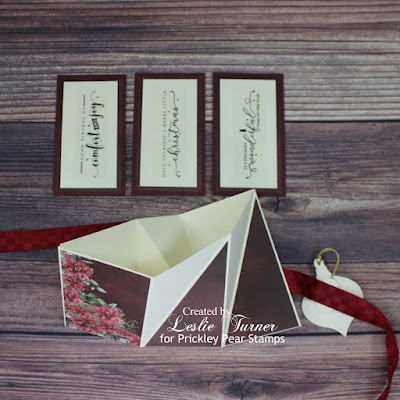
Hello Prickley Pear Stamps fans! Happy Fri-YAY to you! Leslie here, from Love To Scrap 2, sharing another fun fold with you today! This one is a triple pocket twist card which opens to reveal three small cards in the inside pockets. I created the focal on the front of the card using the Ornaments 2 stamp set and coordinating Ornament die


Cut the base from ivory cardstock at 8-1/4" x 8-1/8" and score at 4-1/8" on the 8-1/4" side. Rotate and score at 1/2", 2-7/8", 5-1/4" and 7-5/8" on the 8-1/8" side.

Now, turn the base piece clockwise just a tad and score diagonally from the top of the 1/2" score line down to the bottom of the 5-1/4" score line. Score again from the top of the 2-7/8" score line down to the bottom of the 7-5/8" score line.

On the 8-1/4" side of the base piece with the 1/2" margins at the top and bottom, trim away the top left 1/2" portion to the 4-1/8" score line and miter the corners. Next, trim away the bottom right 1/2" portion from the 4-1/8" score line out to the right edge, and miter those corners as well. This will leave 1/2" flaps on the top right and the bottom left; apply double-sided tape to the flaps. Fold on all score lines in both directions, back and forth, so the base piece is flexible.

Fold the base piece in half (down the center of the 8-1/4" side on the 4-1/8" score line), remove the liner from the double-sided tape and fold the flaps inward, and adhere. This will form a large pocket (opening at the top) with a left, middle and right section. The left section does not have a diagonal score line. The middle and right sections do have diagonal score lines. 

Cut one 4" x 2-1/2" rectangle from patterned paper and adhere to the left section (the large portion that does not have a diagonal score line). Next, cut two 3-7/8" x 2-1/4" rectangles from patterned paper and cut each into two triangles (from the top right down to the bottom left) so you end up with four triangles. Adhere two of these triangles to the bottom portion of the middle and right sections (on the same side as the larger rectangle). Flip the base piece over (opening at the top) and adhere the other two triangles to the upper portion of the middle and right sections - this step is not shown in the photo.


Pinch the middle section and bring the left section over toward the right to form the first twist. Then pinch the right section and bring the left portion over toward the right again to form the second twist.

Using the Ornaments 2 stamp set and coordinating Ornament die, create a focal image for the front of the card. Wrap ribbon around the card and tie in a bow, adhering the ribbon to the back of the card and adhering the stamped and die cut ornament to the front of the ribbon.

Cut the three small cards for the inside pockets at 4" x 2-1/4" from burgundy cardstock along with patterned paper and ivory cardstock layering panels 1/8" smaller. Add sentiments to the small cards to complete the project. 


Prickley Pear Stamps products used:
Ornaments 2 stamp set 
Ornament die

Thanks so much for stopping by today - we'll see you next time!

Scrappy hugs,
Leslie