Showing posts with label Christmas Cards. Show all posts

Wednesday, November 8, 2023

Prickley Pear Stamps' Be Merry Instagram and YouTube Hop and Giveaway


Welcome back to Prickley Pear!  We are so excited to share our holiday inspiration with you today while having two hops today, one on Instagram and one on YouTube!   Our designers have come up with gorgeous inspiration for you and what 's even more more fun you will have the opportunity to win one of (two) $25 store credits by participating in the hops.  Be sure to follow, like and comment on the entries along the hop trail!  We sure hope  you enjoy it!  


Here are a few sneak peeks you will see along the way!!! 


There will be much more inspiration along the way and we can't wait for you to spend some time with us.   
Start the Instagram hop HERE
Start the YouTube hop HERE

GIVEAWAY: Leave a comment and a "like" and follow each designer at each hop stop for a chance to win a $25 gift card from Prickley Pear Stamps! P. A winner will be chosen randomly from all comments left by November 15 at 11:59PM EST. 
The winner will be announced on Prickley Pear the YouTube on November 17th! 


FTC Disclaimer: This Giveaway is not in any way associated or affiliated with YouTube or any other company. Prickley Pear Stamps sponsors all giveaway products. The official rules for this Giveaway: *All entrants must be 18 years of age (or older) to participate. *This contest ends on Monday, November 15t, 2023, at 11:59 pm ET. We will announce a winner on November 17th , 2023, on the Prickley Pear Stamps Channel , so be sure to check back! This Giveaway is wholly compliant and consistent with the YouTube Terms of Service and is solely sponsored by Prickley Pear Stamps.  


Enjoy the hop and happy crafting!!

Friday, September 8, 2023

September 8, 2023 - Christmas with Spinach and Ramona - CLR288

Happy Friday, Pals!  I hope you have had an amazing week!  Kim here to share another, very different card that I created using the Christmas with Spinach and Ramona stamp set. 

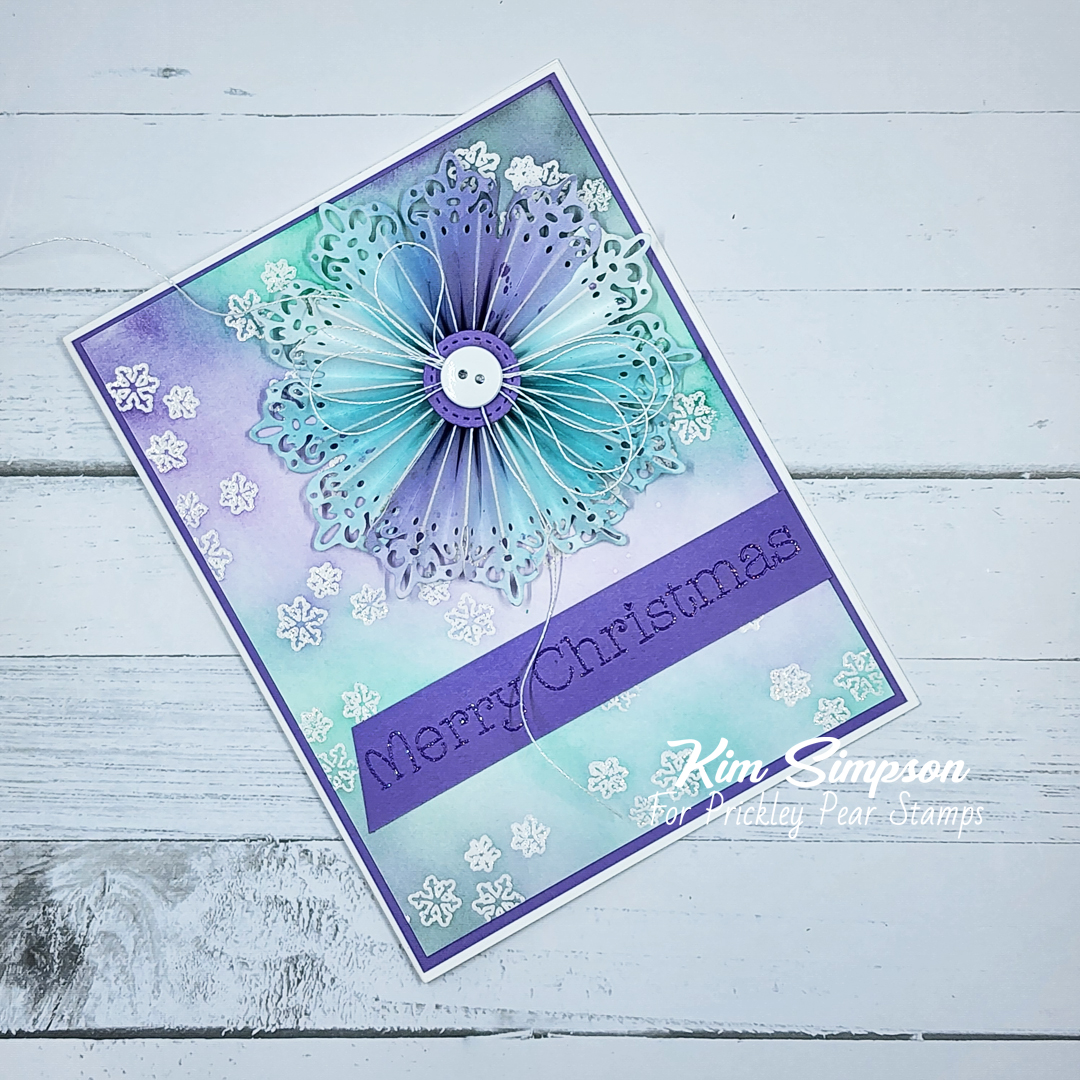
I wanted to show a different way to use this stamp set, so I dug into my toolbox of techniques, and pulled one out from WAY back!  This stamp set has some great smaller stamps included, and I decided to create a background using the smallest snowflake stamp.  I stamped it all over a white card panel using Versamark ink, and I heat embossed it using a glorious sparkly embossing powder. 

I ink blended over the embossed panel using shades of aqua, lavender, and purple.  Once I was happy with the color saturation, I rubbed the embossed areas with a clean tea towel, which removed the ink from the embossed surface.  (If you are not familiar with this technique, it is called Emboss Resist - essentially, the embossing resists the ink.)

I created a beautiful rosette using paper in the same colors and added a loopy white bow and a button to the front of it.  If you wanted to be really fancy, you could adhere the rosette with a removable glue dot, and string a ribbon from it so that it could be used as an ornament.   Lastly, I added a sentiment strip, embossed in the same sparkly powder. 


I really love the non-traditional holiday color palette!  It is so soft and beautiful!  

Thanks so much for spending a few minutes with me. 

Xoxo, Kim

**Affiliate links have been provided at no additional cost to you.  Thanks so much for supporting my crafty hobby!**


Saturday, August 12, 2023

Saturday August 12th, Christmas with Spinach and Ramona CLR288 Stamps


Happy Saturday Pals! Tia here with you from RockyMtnCraftia.com  I hope your have been enjoying the new release of  Christmas with Spinach and Ramona 

I have been playing around with 'pop-out' cards lately and knew these special frogs needed a very special card!

Here is the front of the card:


I used my Cricket to cut the greeting and then foiled it for that holiday flair.

Here is a close up of the inside.


I had so much fun adding stickles to my snowy peaks. And glossy accents to the ornaments, mushrooms, candy canes and even the froggy eyes!

These froggy siblings are too cute to pass up! Make sure you head over to the store and add them to your cart now!

There's more froggy goodness to come this month! As well as some more new stamps to the Prickley Pear Family, so make sure you keep logging in here and on the Facebook page!

Thanks for following along and now it's your turn to Go Get Crafty!

-Tia


Thursday, August 10, 2023

August 10, 2023 - Christmas with Spinach and Ramona - CLR

Hello pals!  Kim, here, today to share the card I created using the adorable brand-new Christmas with Spinach and Ramona stamp set.  I hope that you have been loving the design team inspiration so far! 


Frog Pals Spinach and Ramona was the first Prickley Pear stamp set I ever created with and has remained my favorite!  When I found out that my favorite frogs were coming back to celebrate Christmas with us, I was over the moon! 


I colored these cuties with Copic Markers and added some 3D Snow Gel to the snow drifts aand ornaments to add some texture.  To complete the card, I added some snowflake embellishments and, of course, a loopy bow. 
I hope that you love this sweet stamp set as much as I do!  If you are a fan of Spinach and Ramona, grab the Spinach and Ramona Bundle!  It includes the Frog Pals stamps and dies along with the Christmas with Spinach and Ramona stamp set.  Even better, it is discounted!  
Thanks so much for spending a few minutes with me!  
Xoxo, 
Kim

**Affiliate links have been provided at no additional cost to you.  Thanks so much for supporting my hobby!**

Wednesday, August 9, 2023

August 9, 2023, Christmas with Spinach and Ramona CLR288 Stamps

Hey everybody! I hope you're having a great week! Leslie here, sharing an inspiration project featuring the NEW Christmas with Spinach and Ramona stamp set! I created a slimline card in a pale pink and green color combo, and OMGoodness, talk about totally adorable! These two couldn't be any cuter!


I cut a 3-3/4" x 9" slimline card base from white cardstock along with layering panels from pale pink, pale green and dark green patterned papers. I stamped the image from the Christmas with Spinach and Ramona stamp set in black ink on white cardstock, colored it with alcohol markers, and then fussy cut it. I adhered the image to the card front and stamped the sentiment dark green ink. The finishing touch was adding several pink gemstones. 


Prickley Pear Stamps products used:
Christmas with Spinach and Ramona stamp set

Thanks so much for stopping by today - we'll see you again soon!

Scrappy hugs,
Leslie
Blog / Facebook / Instagram / Pinterest / Twitter

Saturday, July 22, 2023

Saturday July 22nd- Christmas Trees-CLR009


 Happy Saturday Pear Pals! Tia here from RockyMtnCraftia.com. I can't believe I am writing to you from our boat sitting on a lake! And talking about Christmas! What a month this has been and the design team's cards are all so awesome! 

My card today featues a stamp classic! Christmas trees! I wanted to keep it clean and use as many of the stamps in the set as I could. When I started to look at inks I wasn't happy with the way they looked on the white paper. What to do, what to do? In steps my Watermark ink to the rescue!

I think the tone on tone really let the stamp images shine.

Additionally I used green glitter embossing powder for the sentiment. And then a gold gel pen to help one set of lights stand out.

Star Dust stickles was also used to outline the snowy hills. The card exceeded standard slimline size, but sometimes your card just has to be big!

The month's not over, there are more team cards to come! Thank you for spending some time with me today! 

 If your not already getting crafty today, then get to it! For me, I'll be fussy cutting and enjoying the breeze!

-Tia


Thursday, July 13, 2023

July 13, 2023 - Christmas Cupcakes - CLR059A

Happy Thursday, pals!  I hope you are having a great week!  Today, I am sharing another project that I created to celebrate Christmas in July!   I may have mentioned this before, but I am just obsessed with the Build-a-Cupcake collection!  I promise this will be my last cupcake card for a little while. 


I had a ton of fun creating this festive Memory Dex card.  I started by die-cutting my dex base three times:  once with a solid card stock for the back, and twice with two different patterned papers.   I cut both of the patterned pieces 1 1/2" from the bottom, and I adhered one piece of each pattern down to the base. 

I colored one of the Christmas Cupcakes with Copic Markers and used the coordinating Build-a-Cupcake Dies to die-cut it.   This coloring adventure was a bit different for me.  I didn't have a good "chocolate" color blend in my repertoire, so I did a little bit of digging and came up with one that required underpainting with a bold blue.  That was a bit terrifying, but I really love the rich chocolate color.  

I die-cut some festive greenery to make a backdrop for the cupcake and created a sentiment banner, which I adhered to the back before adding it to the front of the dex card. 

Lastly, I added a burlap ribbon to the front.  I don't have a clue what you call this sort of "bow that's not a bow."  I stapled the loops to keep them in place, and then I ran a strip of hot glue across the card to make sure that the ribbon stayed put. 


I love all the dimension of this project!  Make sure to head over to the shop and check out this incredible collection!  I have gotten so much mileage out of the coordinating stamp sets and dies.  

Thanks so much for spending a few minutes of your busy day with me! 

Xoxo,  Kim

**Affiliate links have been provided at no additional cost to you.  Thanks so much for supporting my hobby!**


Friday, July 7, 2023

July 7, 2023 - Christmas Cupcakes - CLR059A

 Hello pals!  Kim, here, to help celebrate Christmas in July!  Have you been enjoying the inspiration from the Design Team?  


Today, I am sharing a Christmas card that I made using the Christmas Cupcake Stamp Set.  Are you sensing a theme?  I LOVE this cupcake collection so much!  
I colored the cupcake with Copic Markers, used the coordinating dies and set the images aside.  This coloring was a bit different for me.  I have never colored white icing before, so I was a little worried, but I love how it turned out.

I dry embossed a white panel with snowflakes and backed it with red cardstock.  I wrapped both panels with my very favorite, very old gingham ribbon and adhered it to the card base.  I die-cut a pair of ovals - one from patterned paper and one from red card stock that I embossed with the same snowflakes. 
I stamped the sentiment on white card stock and layered it with red and green.  
I popped the cupcake up on foam dots, added a bow to the side of the oval and a handful or pretty red bling! 

I really love how this card came together!  I can't say enough good things about these beautiful cupcakes!  Please make sure to check them out in the store!  You won't be disappoointed! 
Thank you for spending a few minutes with me!  Have an amazing day! 
Xoxo, Kim
**Affiliate links have been provided at no additional cost to you!  Thank you so much for supporting my hobby!**

Tuesday, January 31, 2023

January 31, 2023 - Snow Family Stamp Set CLR231

Hello Prickley Pear Friends!!

Kendra here to share a card featuring the cute Snow Family (CLR231) stamp set! 

We've been having such a mild winter.  The kids have been dreaming of snow, so we can play in it!

I decided to grab the Snow Family (CLR231) stamp set and create my own winter scene:
I stamped three of the cute images on a die cut layer and then colored them with my Copics.

I love pink, purple and teal! 

I love that with this stamp set you can stamp as many snowman/women you want to create your family!

So sweet!

Have a beautiful day! 


Saturday, December 24, 2022

Warm Winter Wishes from Spinach and Ramona!

0Hello again, friends!  This is almost my last Christmas project, I promise!  

The first stamp set that I ever purchased from Prickley Pear Stamps was the darling Frog Pals - Spinach and Ramona stamp set.  I love this stamp set so much, and even more so after Sharon shared with me that Spinach and Ramona are their granddaughter's pet frogs!  How cute is that?    Anyhow, I was dying to dress them up for Christmas and create a card with them.

I colored them with Copic markers in traditional Christmas colors and added some gold accents using a gelly roll pen. I cut them out using the coordinating dies and set them aside. 

I created a layered tree using my Cricut, and I added some sparkle embossing paste that is nearly dried up to add snow.  I am loving the consistency of it for winter scenes, so I can't bear to throw it away, even though it is on its last leg.   
I tore two strips of white paper to create hills, and added the embossing paste to them, and set the wet items aside to dry completely.   I dry-embossed a white panel using a snowflake embossing folder from my stash and layered the panel on a piece of patterned paper.
I heat embossed a sentiment from the Santa and Rudolph stamp set and backed it with red glitter paper.   I adhered all of my elements to the card front and completed my card by adding some glass bubbles and a bow from my favorite ribbon.  I have had this ribbon in my stash for probably 20 years.  How crazy is that?! 
I have to say that this is my absolute favorite card that I have ever made!  I love all of the different texture, and of course the sweet frogs! 
Make sure to head to the shop and check out this sweet stamp set, and all of the other amazing goodies! 
Thank you so much for spending a few minutes with me!  I hope you love this card as much as I do! 
Merry Christmas to you and yours! 
Xoxo, Kim

**Affiliate links provided at no additional cost to you.  Thank you so much for supporting my hobby!**

Tuesday, December 20, 2022

Santa Clause is Coming to Town!

Hello, crafty friends!  I am still having trouble wrapping my head around the fact that there are now only FIVE days until Christmas!  Are you ready?

Today, I am sharing a fun Christmas card that I made celebrating everyone's favorite roly-poly fella.   

I colored up the sweet Santa image from the Santa and Rudolph Stamp Set, cut him out and set him aside. I wanted to keep a lot of white space on my card, but also wanted to incorporate traditional Christmas colors, so I die-cut a bunch of greenery and berries using some dies from my stash.
I dry-embossed a white card panel using a brick embossing folder that I have in my stash and have never used.  Can you believe it?  It was the perfect backdrop for Santa!   (Check out the last photo to really see the embossing.)  I backed the embossed panel with some red glitter paper and adhered it to my card base.  I stamped the "Ho Ho Ho" sentiment from the stamp set and backed the sentiment strip with the same red glitter paper.
  I set about to arrange the greenery and berries on the lower portion of the card and when I was satisfied, adhered them down.  If you have never tried Glad Press 'n Seal, it is my favorite trick for working with clusters of embellishments.  Once you have them arranged, you lay a piece of Press 'n Seal over it, gently rub your hands over it so your cluster sticks, and gently pull it up.  You can then add your favorite adhesive and adhere it to your surface.  It prevents them from moving around too much.  This was a total game changer for me. 

Once the greenery was down, I added the sentiment strip and Santa, and I finished my card with some red bling. 
I hope that this inspires you to get crafty today!  Make sure to head over to the shop and check out all of the amazing products! 
Thank you so much for hanging out with me for a few minutes! 
Xoxo, Kim

**Affiliate links provided at no additional cost to you.  Thank you so much for supporting my hobby!**

Tuesday, December 13, 2022

Deck the Halls!

Hi friends!  I am back again with another Christmas card to share using the You Are Loved Clear Stamp Set.  I really, really love making Christmas cards, so you will be tired of hearing from me by the time Christmas gets here! 

I love everything about this stamp set, and I wanted to create a card that showed nature celebrating.  I colored the image with Copic Markers and cut it out.  I added white embellishments using a Posca Paint Pen and when it was dry, I added some sparkly white embossing paste to the tree, stars, hats, and base of the tree.  
I used a dome-shaped die to die-cut the center of a white panel, and then I dry-embossed the panel.  I used a night sky digital paper inside the dome.
I heat embossed the sentiment and backed the panel with glitter card stock.  I adhered the image to the card base, added a bow of red and white metallic embroidery floss, and added some bling.
I hope you love this card as much as I do!  Make sure to stop by the shop and check out this sweet stamp set!
Thank you so much for hanging out with me for a few minutes! 
Xoxo, Kim

**Affiliate links provided at no additional cost to you.  Thank you for supporting my hobby!**


Sunday, December 11, 2022

The Stockings Were Hung by the Chimney with Care

Hi crafty friends!  I hope your weekend is off to a great start!  Does your family hang stockings?  When I was growing up, stockings were a BIG deal in my family.  My dad traveled a lot for work conferences, and he would fill our stockings with all the silly doo-dads that he brought back, generally office supplies and such, and my brother and I loved it!  As an adult, my grandmother carried on the tradition.  She did a stocking for each of the kids and grandkids and filled them with all of the things that we love! 

When I saw the Stocking 2 Clear Stamp Set, I knew that I needed to create with it.  The stockings themselves are just beautiful, and they were so much fun to color up.  As a matter of fact, I couldn't stop at just one card, so I am sharing this beautiful pair of cards today.

I colored the stockings with Copic markers and I embellished them with a gold get pen and a white Postca Paint pen.  Once they were dry, I cut them out and set them aside.  I heat embossed the sentiments and trimmed the panels down before backing them with glitter cardstock.  I dry embossed white cardstock panels, and backed them with the same glitter cardstock and adhered them to my card bases.  I added the sentiment panels, stockings, and added some loopy bows.  To complete the cards, I added some bling. 


These cards bring up so many happy memories.  I would love to hear what your favorite holiday tradition is!  Please be sure to leave us a comment and share!  Don't forget to stop by the shop and check out the Stocking 1 and Stocking 2 Clear Stamp Sets! 
Thanks so much for spending a few minutes of your day with me! 
Xoxo, Kim

**Affiliate links provided at no additional cost to you.  Thank you for supporting my hobby!**


Wednesday, December 7, 2022

Merry Christmas from Rudolph!

Good morning, Prickley Pear fans!  I am so excited to share my first design team project with you today.  I used the new Santa and Rudolph Clear Stamp Set to create this fun card. 


I colored up this darling little Rudolph with Copic markers and added some white highlights using a Posca Paint Pen.  I cut him out and set him aside. 

I used a fun Christmas knit digital paper that looks so realistic.  I paired it with a dry-embossed panel and some strips of glitter cardstock.  
I also dry-embossed a stitched hexagon to place Rudolph on, and I created a loopy bow and embellished it with a brad that I doctored up by removing the legs and adhering it to the bow with a glue gun.
I don't know about you, but I just love this little fella!  He has to be the cutest Rudolph I have ever seen!  Make sure to head over to the shop to check him out and while you are there, be sure to check out all of the other amazing goodies! 
Thanks so much for hanging out with me!  I hope you are inspired to get crafty! 
Xoxo, Kim

**Affiliate links provided at no additional cost to you.  Thank you for supporting my hobby!**

Wednesday, November 9, 2022

HoHoHo

 It's beginning to look a lot like Christmas at Prickley Pear Stamps!  I am just now starting my Christmas cards, and this little set is just perfect! I love the little sweater on Rudolph♥ The set comes with 10 stamps and 5 sentiments and coordinating dies.


I had so much fun creating this card.  I have colored my image with copics. I added some fun flock to Santa's suit. I embossed the background and then added a die cut mountain scene and added glitter to it.  

Copics used:
Red - R22, R24, R27
Brown - E34, E35, E57, E79
Skin - E50, E51
Black - C5, C7, C9
Grey - C00, C1

Thanks for stopping by and I hope you have a great crafting day!

Hugs~Charlene

Tuesday, August 23, 2022

Mistletoe Message

Hi Prickley Pear Friends! I'm Tia from rockymtncraftia.com. I'm the newest member to the Prickley Pear Family and am SO excited to be here! For my DT debut, I went right to the good stuff...Christmas! I've never been a Christmas in July card maker but this year I was talked into trying by several crafty friends. Turns out it was easier and more addictive than I thought! And now that I've started, I've vowed to keep going until the very end (end of my card recipient list!) 

My card today features the gorgeous Victorian Ornaments 3 set! I love mistletoe and knew I wanted a card for my husband. I came up with the sentiment and created a MS-Word document. After printing it out on the die-cut cardstock frame, I used a little distress ink to create a "glow" where my ornament would be.

I stamped with gray-ink (for the no-lines effect), colored the ornament and fussy cut it out (how did I miss the die for it in the store!) and then attached it with foam tape for dimension. I topped it off with double bows of gold thread. I die-cut the additional vine & berries to break-up the white background and draw attention to the focal image and sentiment.

COPIC Markers Used:
Ornament: Y00; Y11; Y15; YR23
Ribbon: R59; R29; R27; R22
Mistletoe: YG11; YG17; YG25; White Gelly Roll Pen

If you haven't started on your Holiday card-making, I hope I inspired you to start! There are several beautiful ornament sets in the Prickley Pear store-so get them before they are gone. With only 124 days left until Christmas, I've already got another card idea brewing with this set-so come back for more! But more importantly-go create something beautiful!

See you soon!
                -Tia