Tuesday, April 29, 2014

Custom Border Die Tutorial with Barb!

Good morning everyone!  Barb here with a quick and easy tutorial for making a custom border with PPRS dies. I found this technique HERE while surfing blogs and thought It was a great idea, one I have never seen.  If you don't own a lot of border dies but have some smaller single dies this technique will work well.  So lets get started.

Supplies:  small single dies with matching stamps, ruler, pencil, ink pad, card stock,  Big Shot, Cuttlebug or other machine to cut the dies.

First you need to decide what size card you want to do, mine is an A2 size.
Then add your layers of paper and that last layer will be what you will use for the border so 
have that size worked out. It's my top layer.


Take your pencil and ruler, measure a 1/2 in from the right side 
and draw a line. You can use any side.  I decided mine would be on the right.


Now lay out your dies cut side down on the pencil line only about half of the die
should be on either side of the line. Now here's where it gets tricky.  You only want
to cut up to that line.  Not all the way! Also you might want to tape the dies down so
they don't move.  I'm using a magnetic base plate.

Once your dies are cut, remove them and cut away any little 
bits left on that pencil line.

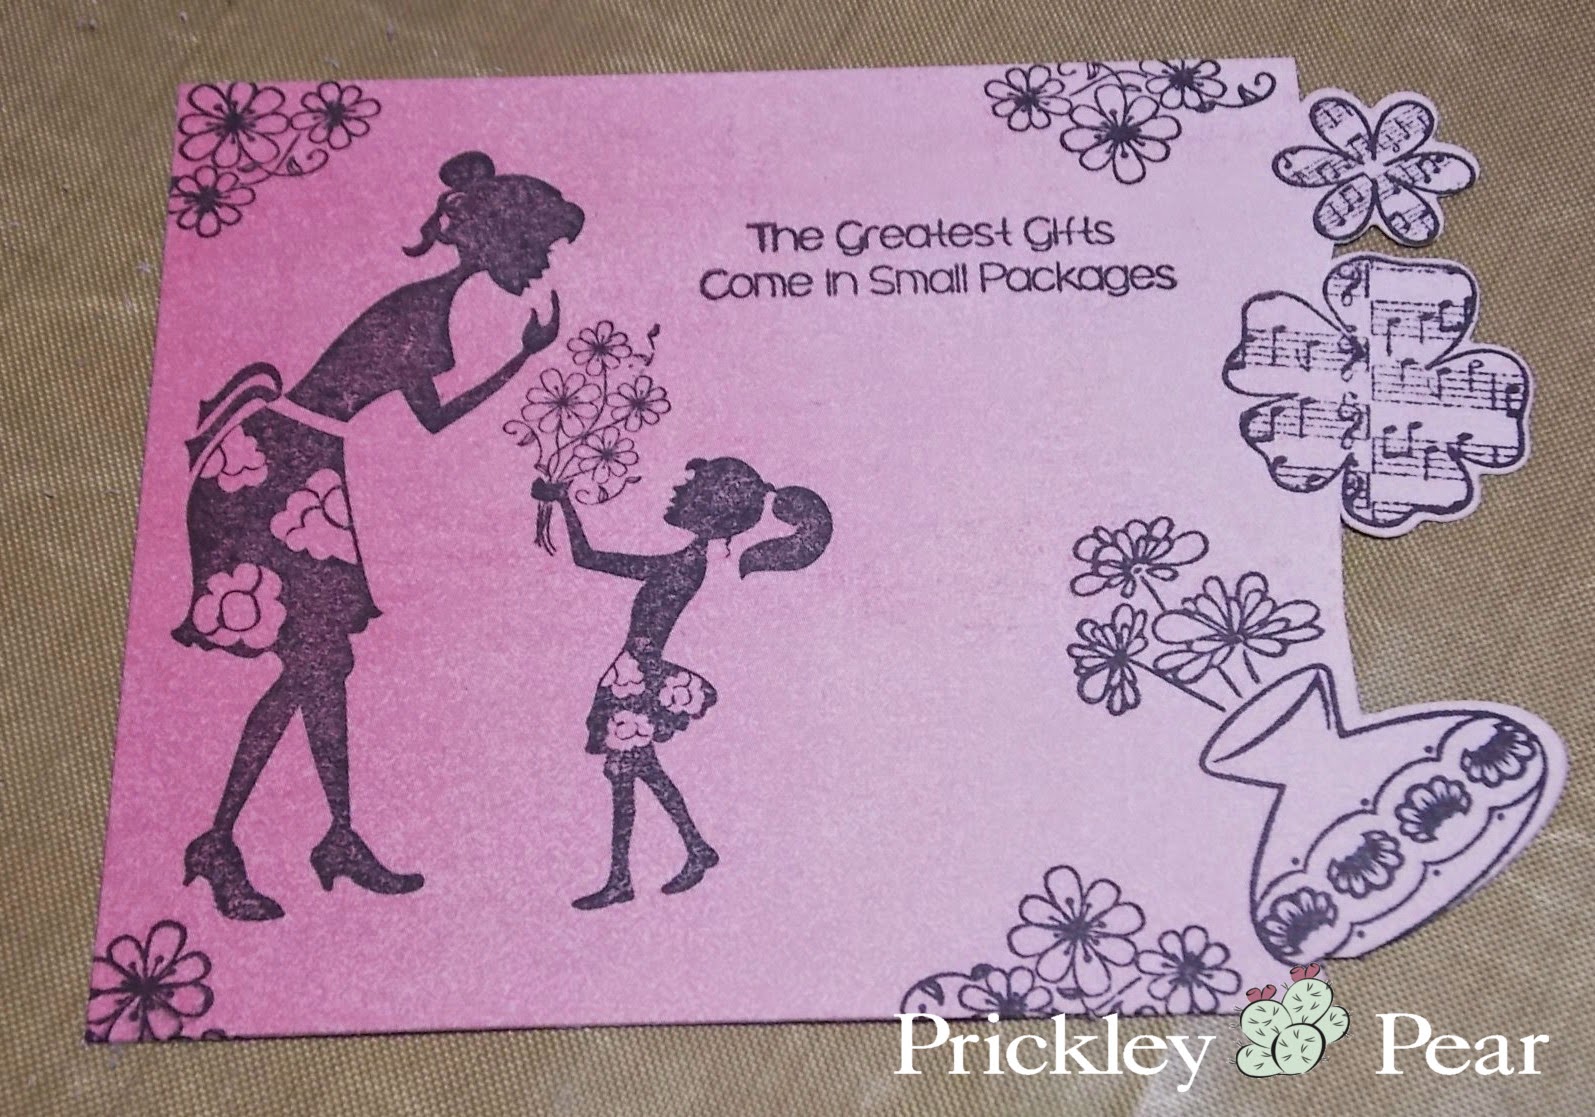
Now comes the fun part!  Stamp your images!

Here's my finished card!


I hope you will give this fun and easy tutorial a try!

Happy Stamping!

Thursday, April 24, 2014

Wonderful Mom

AudreyPettit PPRS WonderfulMomCard
Hi everyone, it's Audrey, and I'm here with one last guest designer project for you today. This time, a little Mother's Day notecard featuring Prickley Pear's adorable Spring Scalloped Circles Clear Stamp Set.
AudreyPettit PPRS WonderfulMomCard2
This sweet little notecard is going to my own wonderful mom for Mother's Day this year. She loves to garden, and loves flowers, so I know this stamp set is absolutely perfect for her. Such a lovely sentiment, and there are so many different flower stems and round frames to choose from. The only tough choice is deciding which ones to use.
 
AudreyPettit PPRS WonderfulMomCard3
For my card, I started by stamping one of the circle frames in pretty teal ink onto white cardstock, then I added two of the flower images in dark brown ink. Watercolored the flowers and frame, fussy cut, and layered with lots of pretty die cuts and papers. Although most of the die cuts are pre-made, one of my layers was die cut using Prickley Pear's Scalloped Circle Die, my all-time favorite PPRS die. Mixing and matching die cuts and images like this is a wonderful way to call extra special attention to your focal point.
AudreyPettit PPRS WonderfulMomCard4
I added Glossy Accents to the flowers for a bit of extra detail. Punched the sentiment using my window slot punch. A bit of foam adhesive between some of the layers helps set them apart. Finished off with buttons and trim. I've had a great time playing with Prickley Pear Rubber Stamps over the past two months. Thanks for all your sweet comments, and thanks for the PPRS team for having me. Pop on over and visit me on my blog sometime! I'd love to see you!

Tuesday, April 22, 2014

Precious Pet Memory Album and BLOG HOP PRIZE NOTICE!

Today I am sharing a project I made for a friend who lost a dear pup.  The new pet stamps from Prickley Pear Rubber Stamps were a perfect touch to tie the album together.

Supplies:
Bo Bunny 6x6 Bare Naked Binder
DeJa Views 12x12 Paper Pack
EE0190 Dogs Leave Paw Prints
BB0045 Paw Print, sm.
GG0196 A Loyal Companion
DD0211 Paw Print

I stamped the paw prints with Gathered Twigs Distress Inks with generation stamping.  (I stamped them off once before adding them to the album so they are more subtle)

I will just show a few of the pages...the paw prints walk across each page perfectly tying the pages together.


And finally, the back cover where I stamped the A Loyal Companion image. 

So, as you can see, these stamps work perfectly for scrapbooking as well as sympathy cards for pets.

NOTICE:  Please check to see if you have won the Blog Hop Prize...if you have not already emailed me your info, I need to get it by next Monday or I will be selecting a new winner!

Monday, April 21, 2014

Inspiration Monday and the Blog Hop WINNERS!

Happy Monday!  Thank you for hopping with us last week...we hope you were inspired with all of the design team's fabulous creations!  ...and they don't stop there, we have more to share with you today!

Designer Brenda Weatherill using: CLR046 Vases, EE0189 Gather Love


Designer Heidi Erickson using:  CLR002A Hibiscus 2 Clear set and JJ0055 Girl with Basket


Designer Maureen Russell using: CLR027C Scalloped Oval 4 - Floral, D045 Flourish Die, CLR046 Vases Clear Set.


Designer Michelle Pearson using: GG0194 Poppy Bud, EE0188 Mothers Hold


Designer Rene Koehn using: CLR002A Hibiscus 2 Clear Set, D002 Hibiscus Die, D030 Mini Hibiscus Die.


Designer Tracy Thompson using: JJ0010 Book With Flowers, CLR023 Mini Butterflies Clear Set, D023 Mini Butterflies Die Set

 
 Designer Angela Bode using: HH0161 Victorian Trike CLR047 Mini Vases.


Now for our Winners!  

Blog Hop Day 1 Winner from Heidi's Blog:
KT Fit Kitty said...
This is gorgeous - love your colour choice. That hummingbird is precious - the daisies are very pretty too!
April 16, 2014 at 7:26 PM

Blog Hop Day 2 Winner from Michelle's Blog:
Sharla's Web said...
Very nicely done! Very comforting and warm, the way it should be!

Blog Hop Day 3 Winner from Angela's Blog:
Great color scheme. Love the die cuts and the glossy accents really added that special touch.

Congrats ladies!  Please comment on this post and I will contact you regarding the mailing of your prize!

Friday, April 18, 2014

In the Meadow....

AudreyPettit PPRS God'sGardenCard 
Hi everyone, it's Audrey again, back today with another fun card to share with you. This time, I combined two of my favorite PPRS clear sets to create a happy meadow scene that's perfect for spring. One of my favorite parts of working with stamps is fact that you can combine the individual images in so many different ways to create tons of unique focal points, like this peaceful garden scene. I am smitten with the little wooden fence image from The Four Seasons Clear Stamp Set. It always makes me think of roaming through pastures on a beautiful spring day. Just the mood I was going for on my card today.
 AudreyPettit PPRS God'sGardenCard2 
To create my scene, I began by stamping the fence image in dark brown ink onto a panel of white cardstock. Colored pencils and chalk pastels add in layers of color for my green fields and blue sky. I stamped the beautiful verse from The Four Seasons set onto cream cardstock, edged in pastels, for a bit of a contrast. Stitched the panel onto my pretty patterned paper card base. AudreyPettit PPRS God'sGardenCard3 
The butterflies, from the Scalloped Oval 4- Floral Clear Stamp Set, were stamped onto watercolor paper in dark brown ink, water-colored and fussy cut before being adhered to the card base. By adding just a small dot of adhesive in the center of the butterfly, the wings can by lightly bent up to give a bit of extra depth and dimension. Finally, the card was finished with a few of my favorite trims. Thanks so much for stopping by! I'll be back next week for one last guest designer project here on the Prickley Pear blog. Hope to see you all then!

Thursday, April 17, 2014

Spring Summer Hop Day 3!


It has finally come....the moment we can reveal our Spring/Summer 2014 collection!  We are celebrating with a 3 day blog hop event!  Join us each day as our new Design Team showcases the new product!  As always, leave comments on each and every blog post along the way since there will be one winner selected for each day's comments!  We will select our winners on April 20 and they will be announced on April 21 in our Monday inspiration post!

Nicole used GG0195 Yellow Polka Dot Bikini and CLR015A Blobby Flowers 2 Clear Set for her card.

Your next stop is Heidi's Blog.

Day 3 - Thursday April 17
PPRS Blog - Nicole ~ you are here!
Heidi
Angie
Tracy
Maureen
Rene
Brenda
Michelle

Wednesday, April 16, 2014

Prickley Pear Blog Hop Day TWO!

It has finally come....the moment we can reveal our Spring/Summer 2014 collection!  We are celebrating with a 3 day blog hop event!  Join us each day as our new Design Team showcases the new product!  As always, leave comments on each and every blog post along the way since there will be one winner selected for each day's comments!  We will select our winners on April 20 and they will be announced on April 21 in our Monday inspiration post!

Here is Nicole's second card for this event!
Supplies:  D045 Flourish Die, D047 Mini Vases Die, CLR047 Mini Vases Clear Set, HH0161 Victorian Trike, D013 Scalloped Circle Die, CLR013 Scalloped Circle Set-Spring

Your next stop on the hop is Barb's blog.

Day 2 - Wednesday April 16
PPRS Blog - Nicole ~ you are here
Barb
Heidi
Maureen
Rene'
Angie
Tracy
Michelle

Tuesday, April 15, 2014

Prickley Pear Spring/Summer 2014 Release Hop - Day 1!

It has finally come....the moment we can reveal our Spring/Summer 2014 collection!  We are celebrating with a 3 day blog hop event!  Join us each day as our new Design Team showcases the new product!  As always, leave comments on each and every blog post along the way since there will be one winner selected for each day's comments!  We will select our winners on April 20 and they will be announced on April 21 in our Monday inspiration post!


Nicole has a card for you today!
Nicole's card features HH0160 Bobby Bronco, DD0212 My Little Buckaroo and D043 Flourished Oval Nesting Dies.

Your next stop on the hop is Barb's blog!  

Day 1 - Tuesday, April 15
PPRS Blog - Nicole ~ you are here
Barb
Maureen
Heidi
Brenda
Angie
Michelle

Monday, April 14, 2014

Brenda's Concertina Style Card Tutorial


Good morning, Benda here with a card idea and tutorial. I had seen a few of these concertina style cards around blogland so decided to have a go for myself and thought I would share my version with you all.


Basic materials – they will depend on what stamps, dies and colours you choose


To start you will need five A4 (similar to foolscap in the States) sheets of reasonable weight cardstock, take four of them to create eight identical shapes with an aperture in the middle. I cut these on my Cricut but you could just as easily cut them with dies.

From the fifth sheet of card cut the hanging central pieces, again you will need two for each section so eight in total. Remember it will need to be a little smaller that the aperture to allow room for it to hang and move. I used my offcuts to cut some leaves and flowers to decorate one hanging section. You also need to cut and score three narrow spines from the offcuts according to the size of your main card base, these will be used to hold the four sections together.

Next stamp four of the eight main sections, or you could cover with Design Papers.


I like to add dimension to my flowers so after colouring with the same distress inks I dab with Versamark and spritz with Glimmer Mist pearl, this makes them very pliable, almost like leather and they can be moulded into shape. As the idea of the ink and mist to make the colours bleed you need to use a medium such as distress ink or watercolour pencils (it won’t work with Copics and similar.)


Once you have stamped and coloured all four of the inner sections lay out all the pieces ready to join up the elements.


Working on one section at a time take the bottom unstamped pieces of both the outer and inner of the card and fix piece of flexible but strong cord down the centre top to bottom. At this point also fix the spine into place, followed by the top stamped sections.

Showing the card building up as you work across the four sections.


Close up of the flower.


This is a real fun card to make, it’s not quick but well worth the time to create something a little bit different. Any questions or problems please do mail me.

Products uses: